Etherpad Exporter
To use, click copy to clipboard, go to your etherpad, and paste, or click save page to disk for etherpad import, go to etherpad, click the double-arrow button in the top right, choose the file just downloaded, and click import now.
Workshop ID:
Welcome to The Carpentries Etherpad!
This pad is synchronized as you type, so that everyone viewing this page sees the same text. This allows you to collaborate seamlessly on documents.
Use of this service is restricted to members of The Carpentries community; this is not for general purpose use (for that, try etherpad.wikimedia.org).
Users are expected to follow our code of conduct: https://docs.carpentries.org/topic_folders/policies/code-of-conduct.html
All content is publicly available under the Creative Commons Attribution License: https://creativecommons.org/licenses/by/4.0/
____________________________________________________________________________________________________________
Sign in: Name, Pronouns, Institution, Email (optional), Twitter (optional)
Please sign in so we can record your attendance.
Please fill out the pre-training survey at https://www.surveymonkey.com/r/instructor_training_pre_survey?workshop_id=INSTRUCTOR_PASTE_WORKSHOP_ID_HERE
Welcome
https://denubis.github.io/instructor-training-8-sessions-DV-BBS-2020/01-welcome/index.html
Questions:
- Who are we and how do we approach teaching?
- What should you expect from this workshop?
Objectives:
- Introduce yourself to your fellow workshop participants.
- Describe what will and will not be covered in this workshop.
- Understand that the Carpentries are communities of volunteers who develop lessons and teach workshops on basic computing and data skills for researchers.
Pronouns and Names
Using correct names and pronouns is important to setting a tone of respect. Learning these is hard to do quickly, so we recommend displaying it prominently during the workshop.
If on Zoom, give everyone a moment to update their display name to reflect this information.
If in person, encourage attendees to put this information on worn name tags or table-displayed name placards.
Note that pronouns are personal and some participants might prefer not to share them. Do not force people to share their pronouns.
Before The Course Begins
Getting to know each other
If the trainer has chosen an icebreaker question, participate by writing your answers in the course’s shared notes.
Code of Conduct
To make clear what is expected, everyone participating in Carpentries activities is required to conform to our Code of Conduct. This Code of Conduct applies to all spaces managed by the Carpentries including, but not limited to workshops, email lists, online forums and on GitHub. Please review the Code of Conduct to familiarise yourself with it.
Introductions
Introductions set the stage for learning.
— Tracy Teal, Former Executive Director, The Carpentries
Hello everyone, and welcome to the Carpentries instructor training. We’re very pleased to have you with us.
Today’s Trainers
To begin class, each Trainer should give a brief introduction of themselves.
(For some guidelines on introducing yourself, see some content from later in the workshop: Workshop Introductions)
Policies for this 8-session class
- Tell us ahead of time and we’ll work something out.
- Miss one class and make up, miss two and you fail.
- Emphasize the fact that people in their GROUP need them to be there
- Icebreakers will start 10 minutes before, 11:50 am
- Darya and Brian reflecting on sticky notes
- Explicit Q&A period for questions from homework and previous class.
Now we would like to get to know all of you.
Reviewing Carpentries Experience and Goals
Please answer the following questions in the shared notes document:
Have you ever participated in a Software Carpentry, Data Carpentry, or Library Carpentry Workshop?
- Yes, I have taken a workshop.
- Yes, I have been a workshop helper.
- Yes, I organized a workshop.
- No, but I am familiar with what is taught at a workshop.
- No, and I am not familiar with what is taught at a workshop.
Which of these most accurately describes your teaching experience?
- I have been a graduate or undergraduate teaching assistant for a university/college course.
- I have not had any teaching experience in the past.
- I have taught a seminar, workshop, or other short or informal course.
- I have been the instructor-of-record for my own university/college course.
- I have taught at the primary or secondary education level.
- I have taught informally through outreach programs, hackathons, libraries, laboratory demonstrations, and similar activities.
Why are you taking this course? What goals do you have for this workshop?
If time permits, the trainer may have you discuss these answers in small groups (in breakout rooms if online), or all together as a group.
Making groups
Find people you’re likely to teach with in geographic or institutional proximity. They’ll be your group for this workshop. Write down your group in our shared document.
To make sure everyone has the same context, we’ll give a brief overview of the Carpentries organization before starting the training.
A Brief Overview of the Carpentries
Software Carpentry, Data Carpentry, and Library Carpentry are official Lesson Programs of the Carpentries. Together, they comprise communities of volunteer researchers, educators, and more who develop lessons and teach intensive one to two day workshops on basic computing and data skills for researchers.
- Software Carpentry focuses on helping researchers develop foundational computational skills
- Data Carpentry focuses on helping researchers work effectively with their data through its lifecycle
- Library Carpentry focuses on teaching data skills to people working in library- and information-related roles.
The main goal of these organizations is not to teach specific skills, per se - although those are covered - but rather, to convey best practices that will enable researchers to be more productive and do better research.
Instructor Training Workshop Overview
The goal of this two-day training is to provide you with the skills and information you need to become a certified Carpentries instructor. Our expectations of certified Carpentries instructors is that they:
- be familiar with and understand how to apply research-based teaching principles, especially as they apply to the Carpentries audience.
- understand the importance of a respectful and inclusive classroom environment; commit to creating such an environment; and be able to identify and implement Carpentries policies and general practices to accomplish this.
- practice and develop skills in the teaching methods used in Carpentries workshops.
- learn enough about the Carpentries organization to know where to go for help, how to start organizing a workshop, and how to get involved with community activities.
These four goals are broken down into four main modules of content:
How Learning Works
One of our main emphases will be discussing the “best practices” of teaching. We will be introducing you to a handful of key educational research findings and demonstrating how they can be used to help people learn better and faster.
Building Teaching Skill
Just like learning a new language, a musical instrument, or a sport, teaching is a skill that requires practice and feedback. We will have many opportunities to practice and give each other feedback throughout this workshop. We welcome questions and dialogue at any point. We’ll be using the Etherpad to help facilitate discussion. Please feel free to ask questions verbally or to put them into the notes or chat box of the Etherpad.
Creating a Positive Learning Environment
One part of making this a productive two days for all of us is a community effort to treat one another with kindness and respect. This training, as in all Carpentries workshops, is subject to the Code of Conduct. We will be able to give our best effort (and have the most fun!) if everyone abides by these guidelines. We will also be discussing and practicing teaching techniques to create a positive and welcoming environment in your classrooms.
Carpentry History and Culture
We will be introducing you to the teaching practices that have been adopted by the Carpentries communities, and our overall philosophy and procedures in order to prepare you to teach Carpentries workshops. The greatest asset of the Carpentries is people like yourselves - people who want to help researchers learn about these ideas and share their own experience and enthusiasm. We hope that this training gives everyone a chance to meet new people and share ideas.
To orient yourself, there is a schedule on the workshop webpage which is linked through this workshop’s Etherpad.
What We Leave Out
We will not be going over Data Carpentry, Library Carpentry, or Software Carpentry workshop content in detail (although you will get familiarity with some of the content through the exercises), This workshop is a significant requirement for becoming a certified Carpentries instructor. The additional steps for certification will require that you dig into the workshop content yourself. We’ll talk about that more tomorrow afternoon.
We also do not discuss how to develop lessons. Many of the ideas we present can be applied to lesson development, and we will briefly touch on a method of lesson design called “Reverse Instructional Design”, but it won’t be an emphasis of this particular course.
If there’s a particular topic that you would like us to address, let the trainers know.
Let’s Get Started
Now that we have a road map of what we’re covering we’re ready to begin our training. Our goal is that by the end, you will have acquired some new knowledge, confidence, and skills that you can use in your teaching practice in general and in teaching Carpentries workshops specifically.
Keypoints:
- The Carpentries are communities of practice. We strive to provide a welcoming environment for all learners and take our Code of Conduct seriously.
- This episode sets the stage for the entire workshop. The introductions and exercises help everyone begin to develop a relationship and trust.
- This workshop will cover general teaching pedagogy and how it applies specifically to the Carpentries.
- Learner motivation and prior knowledge vary widely, but can be assessed with a quick multiple choice question.
-------------------------------------------------------
Building Skill With Practice
https://denubis.github.io/instructor-training-8-sessions-DV-BBS-2020/02-practice-learning/index.html
Questions:
- How do people learn?
- Who is a typical Carpentries learner?
- How can we help novices become competent practitioners?
Objectives:
- Compare and contrast the three stages of skill acquisition.
- Identify a mental model and explain what it represents.
- Explain why practice and feedback are important for learning.
- Explain the purpose of formative assessments.
- Identify formative assessments in your teaching and learning experiences.
We’ll now get started with a discussion of how learning works. We’ll learn some key findings from educational research and identify how these principles are put into practice in Carpentry workshops.
The Carpentries Pedagogical Model
The Carpentries aims to teach computational competence to learners. We take an applied approach, avoiding the theoretical and general in favor of the practical and specific. By showing learners how to solve specific problems with specific tools and providing hands-on practice, we develop learners’ confidence and lay the foundation for future learning.
A critical component of this process is that learners are able to practice what they are learning in real time, get feedback on what they are doing, and then apply those lessons learned to the next step in the learning process. Having learners help each other during the workshops also helps to reinforce concepts taught during the workshops.
A Carpentries workshop is an interactive event – for learners and instructors. We give and receive feedback throughout the course of a workshop. We incorporate assessments within the lesson materials and ask for feedback on sticky notes during lunch breaks and at the end of each day. In this way, instructors can adjust the pace and content of a workshop to meet the needs of the learners in that group, as well as collect feedback that will help us improve lesson materials or methodology for future workshops. Instructors and helpers also provide feedback to learners throughout workshops in order to get them unstuck or provide a greater depth of understanding about the materials. Interacting in this way with the learners helps us determine how they are doing and figure out what concepts people are having trouble with or where we might be able to move along more quickly.
The Acquisition of Skill
Our approach is based on the work of researchers like Patricia Benner, who applied the Dreyfus model of skill acquisition in her studies of how nurses progress from novice to expert (see also books by Benner). This work indicates that through practice and formal instruction, learners acquire skills and advance through distinct stages. In simplified form, the three stages of this model are:

-
Novice: someone who doesn’t know what they don’t know, i.e., they don’t yet know what the key ideas in the domain are or how they relate. One sign that someone is a novice is that their questions “aren’t even wrong”.
Example: A novice learner in a Carpentries workshop might never have heard of the bash shell, and therefore may have no understanding of how it relates to their file system or other programs on their computer.
-
Competent practitioner: someone who has enough understanding for everyday purposes. They won’t know all the details of how something works and their understanding may not be entirely accurate, but it is sufficient for completing normal tasks with normal effort under normal circumstances.
Example: A competent practitioner in a Carpentries workshop might have used the shell before and understand how to move around directories and use individual programs, but they might not understand how they can fit these programs together to build scripts and automate large tasks.
-
Expert: someone who can easily handle situations that are out of the ordinary.
Example: An expert in a Carpentries workshop may have experience writing and running shell scripts and, when presented with a problem, immediately sees how these skills can be used to solve the problem.
For now, we are primarily concerned with novices, as this tends to characterize the Carpentries audience. (We, as instructors, are more likely to be competent practitioners or experts, and we’ll discuss this in a later section). We’ll next use an additional concept to help us differentiate between novices and competent practitioners, which will have implications for how we teach novices.
Cognitive Development and Mental Models
Effective learning is facilitated by the creation of a well-founded mental model. A mental model is a collection of concepts and facts, along with the relationships between those concepts, which a person has about a topic. For example, a long-time resident of the United States may have an advanced understanding of the location of US states, major cities and landmarks, weather patterns, regional economies and demographic patterns, as well as the relationships among these, compared with their understanding of these relationships for other countries. In other words, their mental model of the United States is more complex compared with their mental model of other countries.
We can distinguish between a novice and a competent practitioner for a given domain based on the complexity of their mental models.
- A novice is someone who has not yet built a mental model of the domain. They therefore reason by analogy and guesswork, borrowing bits and pieces of their mental models of other domains which seem superficially similar.
- A competent practitioner is someone who has a mental model that’s good enough for everyday purposes. This model does not have to be completely accurate in order to be useful: for example, the average driver’s mental model of how a car works probably doesn’t include most of the complexities that a mechanical engineer would be concerned with.

We will discuss the mental models of experts in more detail in a later lesson.
Your Mental Models
In the Etherpad, write your primary research domain or area of expertise and some aspects of the mental model you use to frame and understand your work. What concepts/facts are included? What types of relationships are included?
This discussion should take about 5 minutes.
One key insight from research on cognitive development is that novices, competent practitioners, and experts each need to be taught differently. In particular, presenting novices with a pile of facts early on is counter-productive, because they don’t yet have a model or framework to fit those facts into. In fact, presenting too many facts too soon can actually reinforce an incorrect mental model.
Most learners coming to Carpentries lessons are novices, and do not have a strong mental model of the concepts we are teaching. Thus, our primary goal is not to teach the syntax of a particular programming language, but to help them construct a working mental model so that they have something to attach facts to. In other words, our goal is to teach people how to think about programming and data management in a way that will allow them to learn more on their own or understand what they might find online.
The Importance of Going Slowly
If someone feels it’s too slow, they’ll be a bit bored. If they feel it’s too fast, they’ll never come back to programming. — Kunal Marwaha, SWC instructor
If our goal is to help novices construct an accurate and useful mental model of a new intellectual domain, this will impact our teaching. For example, we principally want to help learners form the right categories and make connections among concepts. We don’t want to overload them with a slew of unrelated facts, as this will be confusing.
An important practical implication of this latter point is the pace at which we teach.
In the first main episode of Software Carpentry’s lesson on the Unix shell,
which covers “Navigating Files and Directories”, there are only four “commands”
for 40 minutes of teaching. Ten minutes per command may seem glacially slow,
but that episodes’s real purpose is to teach learners about paths; later on,
they will learn about history, wildcards, pipes and filters,
command-line arguments, redirection,
and all the other big ideas on which the shell depends,
and without which people cannot understand how to use commands.
That mental model of the shell also includes things like:
- Anything you repeat manually, you’ll eventually get wrong
(so let the computer repeat things for you by using tab completion
and the
historycommand). - Lots of little tools, combined as needed, are more productive than a handful of programs. (This motivates the pipe-and-filter model.)
These two examples illustrate something else as well. Learning consists of more than “just” building mental models and adding information to them; creating linkages between concepts and facts is at least as important. Telling people that they shouldn’t repeat things, and that they should try to think in terms of little pieces loosely joined, both set the stage for discussing functions. Explicitly referring back to pipes and filters in the shell when introducing functions helps solidify both ideas.
Meeting Learners Where They Are
One of the strengths of Carpentry workshops is that we meet learners where they’re at. Carpentry instructors strive to help learners progress from whatever starting point they happen to be at, without making anyone feel inferior about their current practices or skillsets. We do this in part by teaching relevant and useful skills building an inclusive learning environment, and continually getting (and paying attention to!) feedback from learners. We’ll be talking in more depth about each of these strategies as we go forward in our workshop.
How “Knowledge” Gets in the Way
Besides going slowly, what else can we do to facilitate the formation of sufficiently accurate mental models? One important action is to address the misconceptions of broken mental models.
Mental models are hardly ever built from scratch. Every learner comes to a topic with some amount of information, ideas and opinions about the topic. This is true even in the case where a learner can’t articulate their prior knowledge and beliefs.
In many cases, this prior knowledge is incomplete or inaccurate. Inaccurate beliefs can be termed “misconceptions” and can impede learning by making it more difficult for learners to incorporate new, correct information into their mental models. Correcting learners’ misconceptions is at least as important as presenting them with correct information. Broadly speaking, misconceptions fall into three categories:
- Simple factual errors, such as believing that Vancouver is the capital of British Columbia. These are the easiest to correct.
- Broken models, such as believing that motion and acceleration must be in the same direction. We can address these by having learners reason through examples to see contradictions.
- Fundamental beliefs, such as “the world is only a few thousand years old” or “human beings cannot affect the planet’s climate”. These beliefs are deeply connected to the learner’s social identity and are the hardest to change.
Since the Carpentries workshops are focused on novices, and the building of strong mental models, we’re most interested in the middle category of misconceptions. While teaching, we want to expose learners’ broken models so that we can help them build better ones.
Identifying and Correcting Misconceptions
How do we expose misconceptions, especially as they pertain to broken models? How can we, in-class, know whether the learners already understand this topic (so that the class can move on), and if not, what misconceptions and gaps in their knowledge we should address.
To be effective, instructors need feedback on their learners’ progress, and insight into their learners’ mental models. This feedback comes through what we call formative assessments (in contrast to summative assessment).
Summative Assessment
Summative assessment is used to judge whether a learner has reached an acceptable level of competence. Learners either “pass” or “fail” a summative assessment. One example is a driving exam, which tells the rest of society whether someone can safely be allowed on the road. Most assessment done in university courses is summative, and is used to assign course grades.
Formative assessment takes place during teaching and learning. It sounds like a fancy term, but it can be used to describe any interaction or activity that provides feedback to both instructors and learners about learners’ level of understanding of the material. For learners, this feedback can help focus their study efforts. For instructors, it allows them to refocus their instruction to respond to challenges that learners are facing.
Learners don’t “pass” or “fail” formative assessments; they are simply a feedback mechanism. For example, a music teacher might ask a learner to play a scale very slowly in order to see whether they are breathing correctly, and if not, what they should change.
Formative assessment is most useful when it happens frequently (we’ll talk about how frequently later) and when the results are easily interpretable by the learner and instructor.
Repetition vs. Reflective Practice
The idea that ten thousand hours of practice will make someone an expert in some field is widely known, but reality is much more complex. Practice is not doing the same thing over and over again: practice is doing similar but subtly different things, getting feedback, and then changing behavior in response to that feedback to get cumulatively better. Doing the same thing over and over again is much more likely to solidify bad habits than perfect performance. This is why we emphasize practice and feedback for learners at our workshops and for trainees in our instructor training program.
Formative Assessments Come in Many Forms
There are many types of formative assessment, and each have their advantages and disadvantages.
Formative Assessments
Based on your previous educational experience (or even this training so far!) what types of formative assessments do you know about?
Write your answers in the etherpad; or go around and have each person in the group name one.
One example of formative assessment that we would like to highlight is the multiple choice question (MCQ). When designed well, these can do much more than just measure how much someone knows. For example, suppose we are teaching children multi-digit addition. A well-designed MCQ would be:
Q: what is 27 + 15 ?
a) 42
b) 32
c) 312
d) 33
The correct answer is 42, but each of the other answers provides valuable insight.
Identify the Misconceptions
Choose one wrong answer and write in the Etherpad what the misconception is associated with that wrong answer. This discussion should take about 10 minutes.
Solution
- If the child answers 32, they are throwing away the carry completely.
- If they answer 312, they know that they can’t just discard the carried ‘1’, but doesn’t understand that it’s actually a ten and needs to be added into the next column. In other words, they are treating each column of numbers as unconnected to its neighbors.
- If they answer 33 then they know they have to carry the 1, but are carrying it back into the same column it came from.
Each of these incorrect answers is a plausible distractor with diagnostic power. “Plausible” means that it looks like it could be right: instructors will often put supposedly-silly answers like “a fish!” on MCQs, but (a) they don’t provide any insight and (b) learners actually don’t find them funny. “Diagnostic power” means that each of the distractors helps the instructor figure out what concepts learners are having difficulty with.
Formative assessments are most powerful when an instructor modifies their instruction depending on the results of the assessment. An instructor may learn they need to change their pace or review a particular concept. Knowing how to respond to the results of a formative assessment is a skill that you will develop over time.
Handling Outcomes
Formative assessments allow us as instructors to adapt our instruction to our audience. What should we do as instructors if the class chooses:
- mostly one of the wrong answers?
- mostly the right answer?
- an even spread among options?
For one of the above, enter your answer in the Etherpad.
This discussion should take about 5 minutes.
Solution
- If the majority of the class votes for a single wrong answer, you should go back and work on correcting that particular misconception.
- If most of the class votes for the right answer, it’s probably safe to move on.
- If answers are pretty evenly split between options, learners are probably guessing randomly and it’s a good idea to go back to a point where everyone was on the same page.
Modeling Novice Mental Models
Take 10 minutes to create a multiple choice question related to a topic you intend to teach. Type it into the Etherpad and explain the diagnostic power of each its distractors, i.e., what misconception is each distractor meant to identify?
A Note on MCQ Design
- A good MCQ tests for conceptual misunderstanding rather than simple factual knowledge. If you are having a hard time coming up with diagnostic distractors, then either you need to think more about your learners’ mental models, or your question simply isn’t a good starting point for an MCQ.
- When you are trying to come up with distractors, think about questions that learners asked or problems they had the last time you taught this subject. If you haven’t taught it before, think about your own misconceptions or ask colleagues about their experiences.
Designing an MCQ with plausible distractors is useful even if it is never used in class because it forces the instructor to think about the learners’ mental models and how they might be broken—in short, to put themselves into the learners’ heads and see the topic from their point of view.
There are many types of formative assessments other than MCQs. One (non-exhaustive) list to supplement the earlier exercise can be found in the Edutopia assessment group.
Formative Assessments Should Be Frequent
Instructors should use a formative assessment ideally every 5 minutes and at least every 10-15 minutes in order to make sure that the class is actually learning. Since the average attention span is usually only this long, formative assessments also help break up instructional time and re-focus attention. Formative assessments can also be used preemptively: if you start a class with a question and everyone can answer it correctly, then you can safely skip the part of the lecture in which you were going to explain something that your learners already know.
How Many?
The Carpentries use formative assessments often. How many have we done since the start of this workshop? Put your guess in the Etherpad along with one example and the purpose that assessment served.
This discussion should take about 5 minutes.
Solution
This will depend on the event they are attending. Most attendees will guess low. The purpose of this exercise is to emphasize the importance of frequent formative assessments and that an individual assessment doesn’t have to take a lot of time.
A Corollary Regarding Novices
Learners are commonly far too satisfied to not understand key points and remain confused. If learners remain confused, they are far less likely to adopt our “good enough” practices at the conclusion of the workshop. Encourage helpers to support confused learners as far as possible within the flow of the workshop.
Optional exercises
Confronting the Contradiction
Describe a misconception you have encountered in your own learning or teaching and how to get learners to confront it.
Keypoints:
- Our goal when teaching novices is to help them construct useful mental models.
- This requires practice and feedback.
- Formative assessments provide practice for learners and feedback to learners and instructors.
-------------------------------------------------------
Wrap-Up and Homework for Tomorrow
https://denubis.github.io/instructor-training-8-sessions-DV-BBS-2020/02a-homework/index.html
Questions:
- What have we learned today?
- What needs to be done to prepare for tomorrow?
Objectives:
- Describe overnight homework.
- Produce a paragraph, drawing, or diagram that summarizes what was taught today.
Homework:
Please read “The Science of Learning”, which provides a brief overview of some key evidence-based results in teaching.
Feedback
The Trainer(s) will ask for feedback on the day in some form.
This exercise should take 5 minutes.
Reflecting on the Day
Before we wrap up for the day, take 5 minutes to think over everything we covered today. On a piece of paper, write down something that captures what you want to remember about the day. The Trainers won’t look at this - it’s just for you.
If you don’t know where to start, consider the following list for a starting point:
- draw a concept map, connecting the material
- draw pictures or a comic depicting one of the day’s concepts
- write an outline of the topics we covered
- write a paragraph or “journal” entry about your experience of the training today
- write down one thing that struck you the most
This exercise should take about 10 minutes.
Keypoints:
-------------------------------------------------------
Expertise and Instruction
https://denubis.github.io/instructor-training-8-sessions-DV-BBS-2020/03-expertise/index.html
Questions:
- What type of instructor is best for novices?
- How are we (as instructors) different from our learners and how does this impact our teaching?
Objectives:
- Explain what differentiates an expert from a competent practitioner.
- Describe at least two examples of how expertise can help and hinder effective teaching.
- Identify situations where you have an expert awareness gap.
- Demonstrate strategies for compensating for your expert awareness gap.
- Demonstrate strategies for avoiding demotivating language.
Having previously discussed the transition from novice to competent practitioner, via the formation of a mental model, we now shift our attention to experts. It’s unlikely that you’ll be teaching experts; the expert we want to talk about is you! You might not yet think of yourself as an expert, but chances are you have already advanced to the point where some of these key characteristics – and potential pitfalls – apply to you. We’ll discuss what distinguishes expertise from novices/competent practitioners, how being an expert can make it more difficult to teach novices, and some tools to help instructors identify and overcome these difficulties.
What Makes an Expert?
An earlier topic described a key difference between novices and competent practitioners. Novices lack a mental model, or have only a very incomplete model with limited utility. Competent practitioners have mental models that work well enough for most situations. How are experts different from both of these groups?
What Is An Expert?
- Name someone that you think is an expert (doesn’t matter what they’re an expert in). As an expert, what makes them special or different from other people?
OR- What is something that you’re an expert in? How does your experience when you’re acting as an expert differ from when you’re not an expert?
This discussion should take about 5 minutes.
The answer is not that experts know more facts (although they almost always do have a lot of knowledge): competent practitioners can memorize a lot of information without any noticeable improvement to their performance. The answer is rather that experts have more connections among pieces of knowledge; more “short-cuts”, if you will.
One way to illustrate this is to model storing knowledge as a graph in which facts are nodes and relationships are arcs. (This is emphatically not how our brains work, but it’s a useful metaphor.) The key difference between experts and competent practitioners is that experts have many more connections among concepts. Their mental models are much more densely connected. Therefore experts can
- see connections between two topics or ideas that no one else can see
- see a single problem in several different ways
- know how to solve a problem, or “what questions to ask”
- jump directly from a problem to its solution because there is a direct link between the two in their mind. Where a competent practitioner would have to reason “A therefore B therefore C therefore D therefore E”, the expert can go from A to E in a single step (“A therefore E”).
We’ll expand on some of these below and how they can manifest in the way you teach.
Connections and Mental Models
The graph model of knowledge explains why helping learners make connections is as important as introducing them to facts. The more connections a fact has to other facts, the more likely the fact is to be remembered. This builds on our earlier idea of mental models - a mental model is (in part) a set of connections or relationships among facts or concepts.
Expertise and Teaching
Because your learners’ mental models will likely be less densely connected than your own, a conclusion that seems obvious to you will not seem that way to your learners. It’s important to explain what you’re doing step-by-step, and how each step leads to the next one.
Another feature of expertise that has important consequences for teaching is the ability of experts to make use of fluid representations. Two ways of thinking about a problem will seem interchangable to an expert, but will not seem that way to a novice. For example, someone with experience using the bash shell will be able to change back and forth between absolute and relative paths with no difficulty and in fact may not even notice they are doing so. A novice learner, however, would be confused by this unexplained use of two different ways of representing a concept.
More Examples of Fluid Representations
- Programming: Referring to an R object like
abcdeas both “character vectors” and “strings”.- Programming: Switching among
df[,1],df[,'foo'], anddf$foonotation when talking about columns in a data.frame.- Biology: Switching between common species names and Latin names (e.g. “mouse” vs “Mus musculus”).
- Biology: Using both three letter and one letter amino acid codes interchangeably (e.g. Lys = K = Lysine).
- Chemistry: Switching between “Reference material” and “Standard”
- Mathematics: Thinking of things algebraically vs geometrically.
- Navigation: Switching among different routes between two locations.
Fluid Representations
In the Etherpad, give at least one example of a fluid representation that you use in your own work. If you can, also give an example of a fluid representation that might occur in a Carpentry lesson.
Building awareness of how you can represent the same concept in multiple different ways will help you avoid doing so without explanation while teaching.
This discussion should take about 5 minutes.
Experts are also better at diagnosing errors than novices or competent practitioners. If faced with an error message while teaching, an expert will often figure out the cause of the error and develop a solution before a novice has even finished reading the error message. Because of this, it is very important while teaching to be explicit about the process you are using to diagnose and correct errors, even if they seem trivial to you, as they often will.
Diagnosis (Optional)
What is an error message that you encounter frequently in your work? (These are often syntax errors.) Take a few minutes to plan out how you would explain that error message to your learners. Write the error and your explanation in the Etherpad.
This discussion should take about 5 minutes.
Another potential challenge for experts who teach is known in the literature as expert blind spot. Experts are frequently so familiar with their subject that they can no longer imagine what it’s like to not understand the world that way - this inability to consider the material from a non-expert perspective can lead to what’s known as the expertise-reversal effect - experts are often less good at teaching a subject to novices than people with less expertise who still remember what it’s like to have to learn the things. This effect can be overcome with training, but it’s part of the reason world-famous researchers are often poor lecturers.
Expert Awareness Gap
In the Carpentries, we aim to create an inclusive environment. We prefer to refer to this phenomenon as the expert awareness gap to be consistent with our objective to use inclusive language. It can be exclusionary to use a term that relates to a disability for other purposes. We introduce both terms, however, to help you as future instructors engage with these ideas in the literature and with people outside of the Carpentries community.
In evaluating potential terms, one instructor provided the following thoughts:
I like expert awareness gap because it’s more precise than blind spot (it’s not about seeing, but about noticing) and feels more of a surmountable challenge than a disadvantage. To me a disadvantage can sometimes feel like thing that exists as a fact, like an inevitable consequence, but a gap is a thing to be bridged– and we certainly want instructors to try to overcome (or mitigate) their expert awareness gap
Awareness Gaps (Optional)
- Is there anything you’re learning how to do right now? Can you identify something that you still need to think about, but your teacher can do without thinking about it?
- Think about the area of expertise you identified for yourself earlier. What could a potential awareness gap be?
The challenge of identifying and working around expert awareness gaps is one reason why we welcome instructors who still identify as “novices”! Someone who is still in the process of learning can be a more effective instructor because they are speaking from their own recent experience.
Dismissive Language
Experts often betray their extensive knowledge by using the word “just” in explanations, as in, “Oh, it’s easy, you just fire up a new virtual machine and then you just install these four patches to Ubuntu and then you just re-write your entire program in a pure functional style—no problem.” This gives learners the very clear signal that the instructor thinks their problem is trivial and that they therefore must be stupid.
With practice, we can change the way we speak to avoid this type of demotivating language and replace it with more positive and motivating word choices.
Changing Your Language
What other words or phrases can have the effect of demotivating learners? What alternatives can we use to express this meaning in a positive and motivational way?
In the Etherpad, make a list of demotivating words/phrases and alternatives.
This discussion should take about 5 minutes.
Solution
Courtney Seiter lists 10 words and phrases that can change a conversation: if, could, yes, together, thank you, choose to, and, because, willing, and the person’s name. These are motivating words and phrases that can shift mindsets. Jason Fried lists several dirty four-letter words: need, must, can’t, easy, just, only, and fast, as well as examples of how they are used to demotivate. Statements like:
- “We really need it.”
- “If we don’t we can’t …”
- “Wouldn’t it be easy if we just did it like that?”
- “Can you try it real fast?” can be perceived as dismissive or demeaning or worse.
Another language choice that can have very positive effects on learner mindset is to ask “What questions do people have?” rather than “Does anyone have any questions?” Asking “Does anyone have any questions?” can create the impression that you hope people don’t have questions, so that you can continue on with the lesson. By asking what questions people have, you are setting up an expectation that people will, indeed, have questions, and that that is normal and expected.
Expert Advantages
In these ways and others, the high connectivity of an expert’s mental model poses challenges while teaching novices. However, that’s not to say that experts can’t be good teachers. Experts can be effective as long as they take the time to identify and correct for their own expert awareness gaps. You can use some of the exercises we’ve done while preparing to teach to help you overcome these challenges.
Because of their well-connected knowledge, self-aware experts are well-poised to help students make meaningful connections among their knowledge, to confidently turn an error into a learning opportunity, or to explain a complex topic in multiple ways. The important thing is to identify awareness gaps and to try to see things from the learner’s perspective as much as possible.
You Are Not Your Learners
One way to overcome these limitations is by understanding the goals and motivations of your learners. We will discuss motivation in more depth in a later lesson but for now, consider some of these ideas about the typical audience for Carpentry workshops.
- Most scientists’ primary goal is not to program, but to do scientific research. They may not care how hash tables work, or even that hash tables exist; they just want to know how to process data faster. We therefore have to make sure that everything we teach is useful right away, and conversely that we don’t teach anything just because it’s “fundamental”.
- Believing that something will be hard to learn is a self-fulfilling prophecy. Researchers already believe that computing is hard, a belief that is exacerbated by “experts” telling them that things should be easy when, in the researcher’s experience, they’re not. Paradoxically, this is why it’s important not to say that something is easy. If someone who has been told that tries it, and it doesn’t work, they are more likely to become discouraged.
It’s also why installing and configuring software is a much bigger problem for us than experienced programmers like to acknowledge. It isn’t just the time we lose at the start of workshops as we try to get a Unix shell working on Windows, or set up a version control client on some idiosyncratic Linux distribution, or ask people to download and unzip files. It isn’t even the unfairness of asking learners to debug things that depend on precisely the knowledge they have come to learn, but which they don’t yet have. The real problem is that every such failure reinforces the belief that computing is hard, and that they’d have a better chance of making next Thursday’s conference submission deadline if they kept doing things the way they always have. For these reasons, we have adopted a “teach most immediately useful first” approach. We’ll talk much more about this when we discuss motivation.
The Carpentries Is Not Computer Science
Many of the foundational concepts of computer science, such as computability, are difficult to learn and not immediately useful. This does not mean that they aren’t important, or aren’t worth learning, but if our aim is to convince people that they can learn this stuff, and that doing so will help them do more science faster, they are less compelling than things like automating repetitive tasks.
The Importance of Practice (Again)
All of the above points illustrate the importance of using formative assessments frequently. The right formative assessment at the right time will give you valuable information about your learners’ goals and motivations, making it easier for you to target your lesson materials to their needs. This strategy also helps you as an instructor overcome your expert awareness gap. It doesn’t matter how easy you think a task is, if your learners aren’t getting it, it’s probably more complicated than you thought.
Keypoints:
- Experts face challenges when teaching novices due to expert awareness gap.
- Expert awareness gap: knowing something so well that it seems easy when it's not.
- With practice, we can learn to overcome our expert awareness gap.
-------------------------------------------------------
Memory and Cognitive Load
https://denubis.github.io/instructor-training-8-sessions-DV-BBS-2020/04-memory/index.html
Questions:
- What is cognitive load and how does it affect learning?
- How can we design instruction to work with, rather than against, memory constraints?
Objectives:
- Remember the quantitative limit of human memory.
- Apply concept mapping as a strategy to identify concepts and relationships required in a lesson.
- Use a concept map to plan a formative assessment strategy.
- Name the three components of cognitive load theory and which should be emphasized or diminished.
- Identify when cognitive load is likely to limit learning.
In our final topic in how people learn (and therefore, how we can be more effective instructors), we’ll be learning more about human memory: specifically, how to remove unnecessary “load” in order to facilitate learning.
Types of Memory
Learning involves memory. For our purposes, human memory can be divided into two different layers. The first is called long-term. It is where we store persistent information like our passwords and our home address. It is essentially unbounded (barring injury or disease, we will die before it fills up) but it is slow to access.
Our second layer of memory is called short-term. This is the type of memory you use to actively think about things and is often called working memory. It is much faster, but also much smaller: in 1956, George Miller estimated that the average adult’s short-term memory could hold 7±2 items for a few seconds before things started to drop out. This is why phone numbers are typically 7 or 8 digits long: back when phones had dials instead of keypads, that was the longest sequence of numbers most adults could remember accurately for as long as it took the dial to go around and around.
More recent research suggests that short-term memory is actually even smaller than this. Regardless of its exact size, which may differ across people and contexts, we know that short-term memory is limited. This has important implications for teaching. If we present our learners with large amounts of information, without giving them the opportunity to practice using it (and thereby transfer it into long-term memory), they won’t retain the material as well as if we present small amounts of information interspersed with practice opportunities. This is yet another reason why going slowly and using frequent formative assessment is important.
Test Your Working Memory (5 min)
This website implements a short test of working memory.
Take 5 minutes to complete the exercise. What was your score? Write your answer in the Etherpad.
Test Your Working Memory - Analog version (5 min)
Read the following list and try to memorize the items in it:
cat, apple, ball, tree, square, head, house, door, box, car, king, hammer, milk, fish, book, tape, arrow, flower, key, shoe
Without looking at the list again, write down as many words from the list as you can. How many did you remember? Write your answer in the Etherpad.
Most people will have found they only remember 5-7 words. Don’t worry if you remembered fewer - many factors can affect short-term memory in different situations. Fortunately, there are techniques that we can use to improve our effective short-term memory. We’ll illustrate one of these techniques and then describe how this is applicable to our workshops.
Strategies For Memory Management
Our role as instructors, therefore, is to help our learners by not flooding their short term memory with too much information, partially by providing strategies and exercises to help them form the connections that will move concepts into long-term memory. What are some tools for doing this?
Chunking
One is by explicitly forming connections or groupings.
Our minds can store larger numbers of facts in short-term memory by creating chunks, or
relationships among separate items, causing them to be remembered as a single item.
For example, most of us will remember a word we read as a single item (“cat”), rather
than as a sequence of letters (“c-a-t”).
Similarly, the pattern made by five spots on cards or die is remembered as a whole
rather than as five separate pieces of information.
Improving Short-term Memory with Chunking
Repeat the memory exercise you did earlier, but this time, try to form short stories or phrases, or a visual image, from the words you see.
Write the number of words you remembered in the Etherpad. How does this compare with your first attempt?
Storing words in groups reduces the number of effective items in your short-term memory, allowing you to keep more information in your head at once. This is one reason why helping our learners to see the connections among the concepts we are teaching is so important.
Active Learning Through Formative Assessment
Formative assessment is a key component in helping learners solidify their understanding and transfer ideas from short-term memory into long-term memory. It’s important to use formative assessments frequently to help learners transition new concepts into their long-term memory, before their short-term memory fills up. It can be helpful to use pedagogical planning tools to identify the number of concepts that are being introduced in a lesson and plan where to include formative assessments.
Limit concepts
In the same vein as “going slowly,” it’s important to limit the number of concepts introduced in a lesson; no matter how many exercises or formative assessments you do, you can’t overcome the limit of items that can be shored in short-term memory.
Concept Maps as Instructional Planning Tools
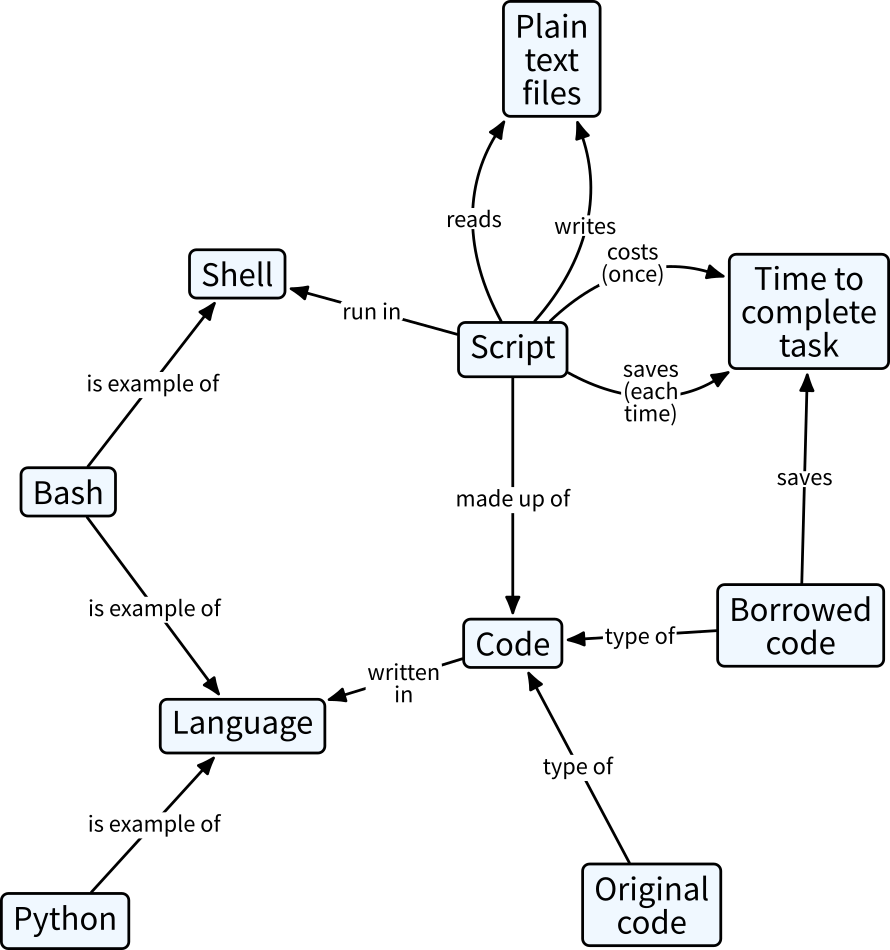
One tool that can be used to identify the number of concepts being introduced in a lesson is the concept map. A concept map is a picture of someone’s mental model of a domain: facts are bubbles, and connections are labelled arcs. It is important that they are labelled: saying “X and Y are related” is only helpful if we explain what the relationship is.
To show what concept maps look like,
consider this example of a for loop in Python:
for ch in "abc":
    print(2*ch)
The three key concepts used in this loop are:
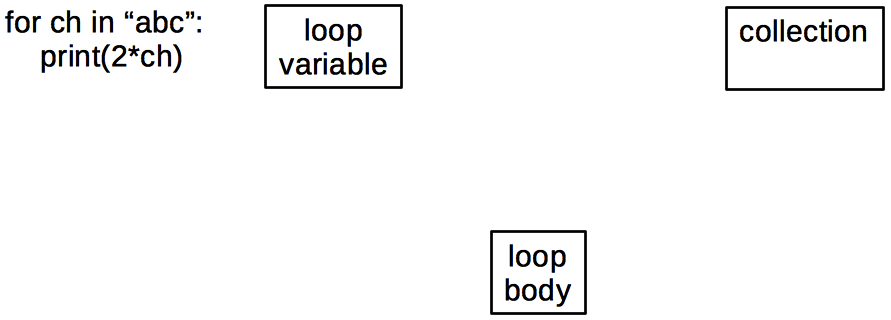
The key relationships, which are as important as the concepts themselves, are:
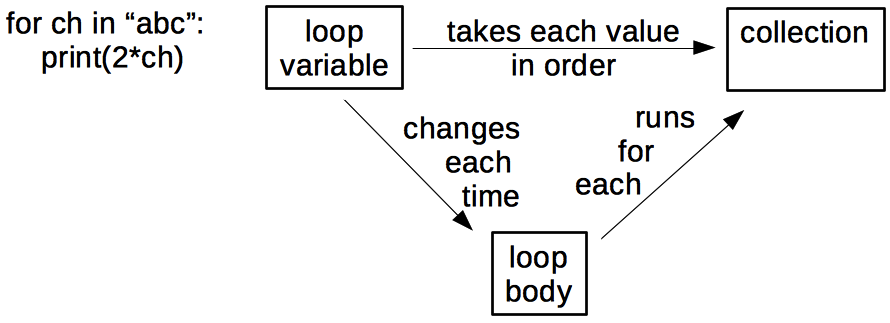
A quick count shows that there are actually 6 things here, not just 3, so we’re already brushing up against the limits of short-term memory. If we add two more facts to show things that are usually (but not always) true:
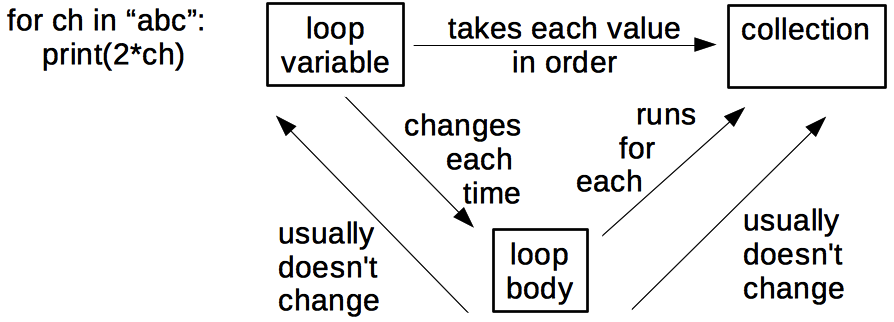
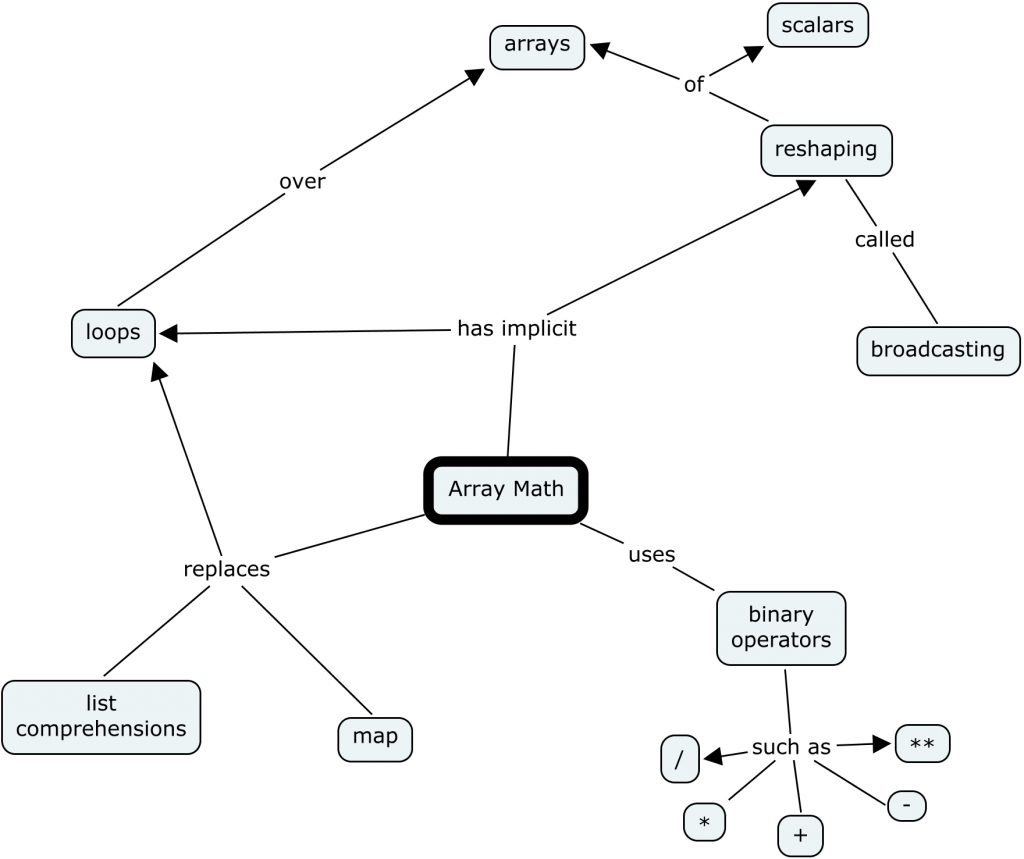
the count rises to 8, which is a good size for a single teaching episode. A few other concept maps drawn by previous participants in this training course are listed below:
- Array Math
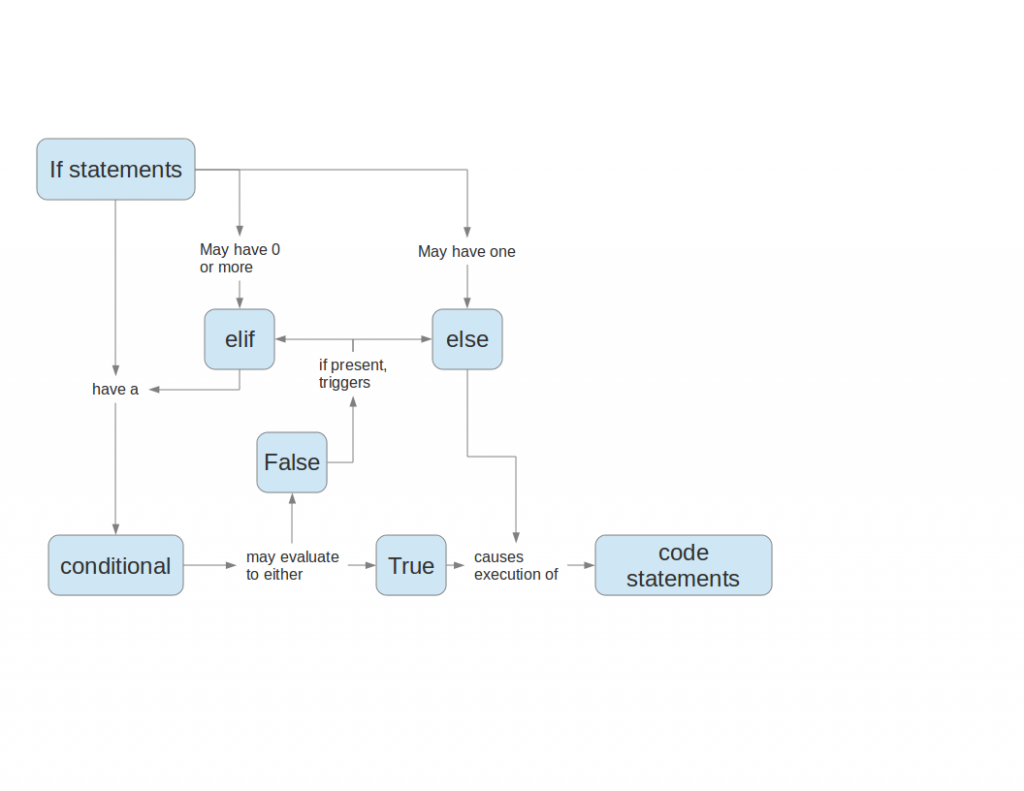
- Conditionals
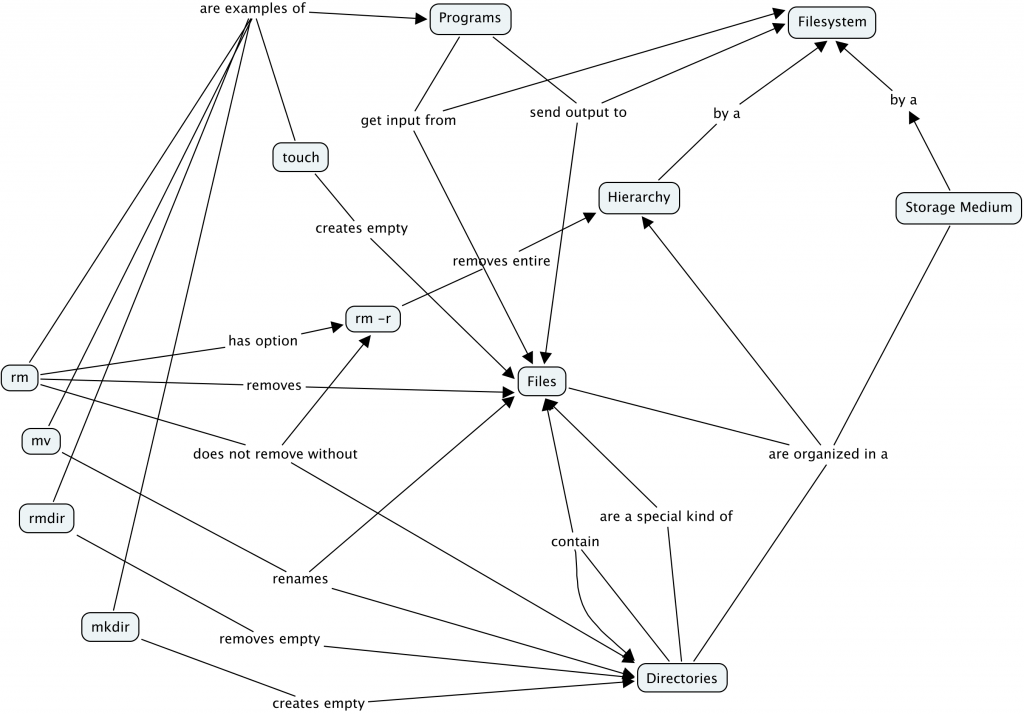
- Creating and Destroying Files
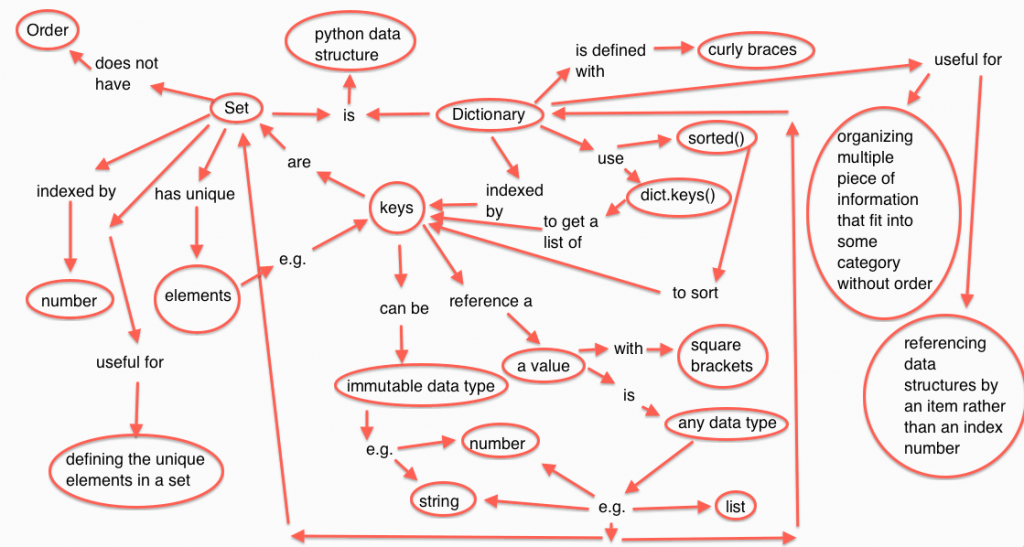
- Sets and Dictionaries in Python
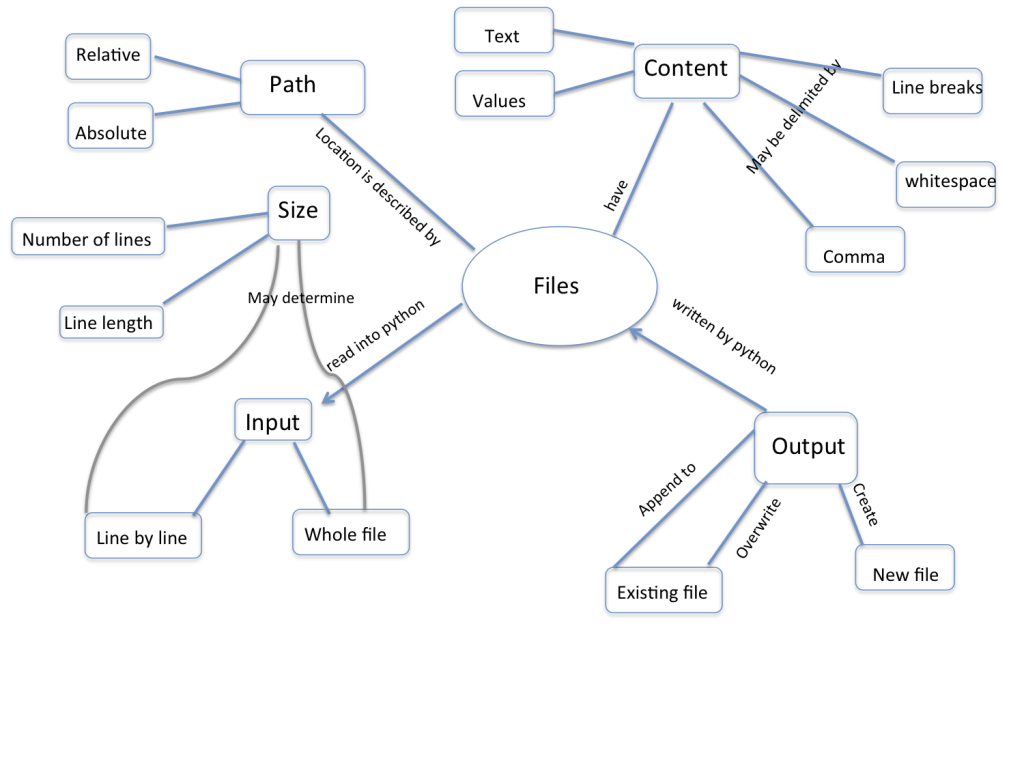
- Input and Output
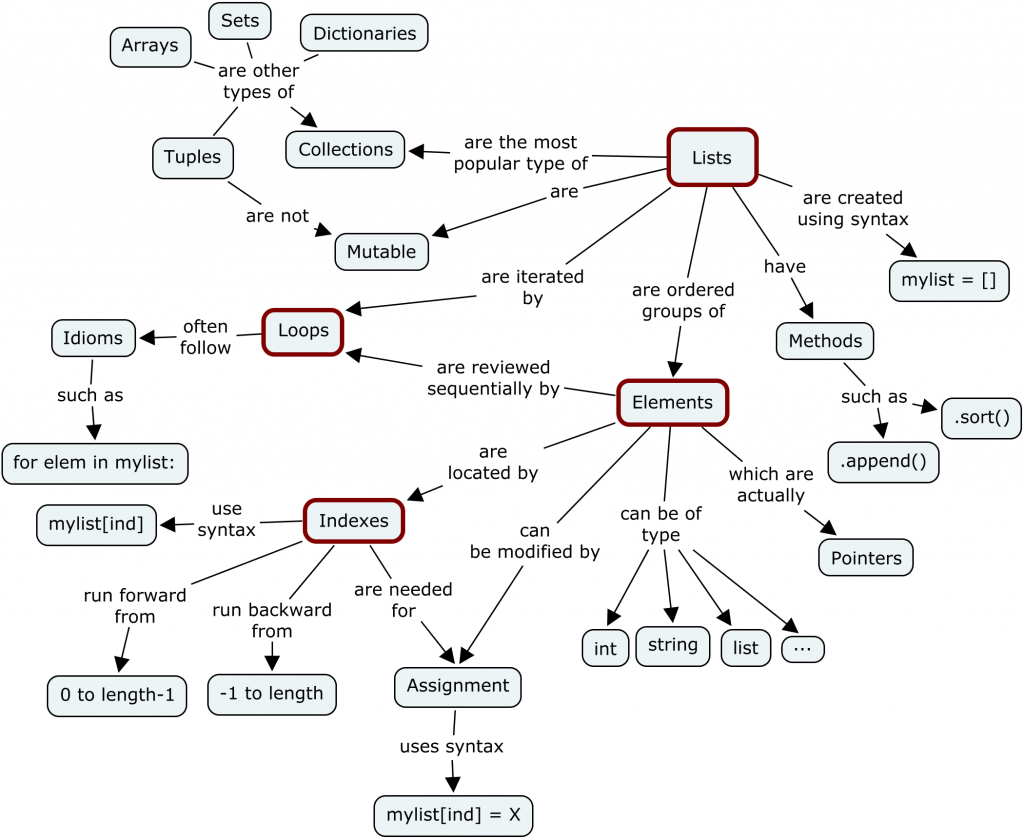
- Lists and Loops
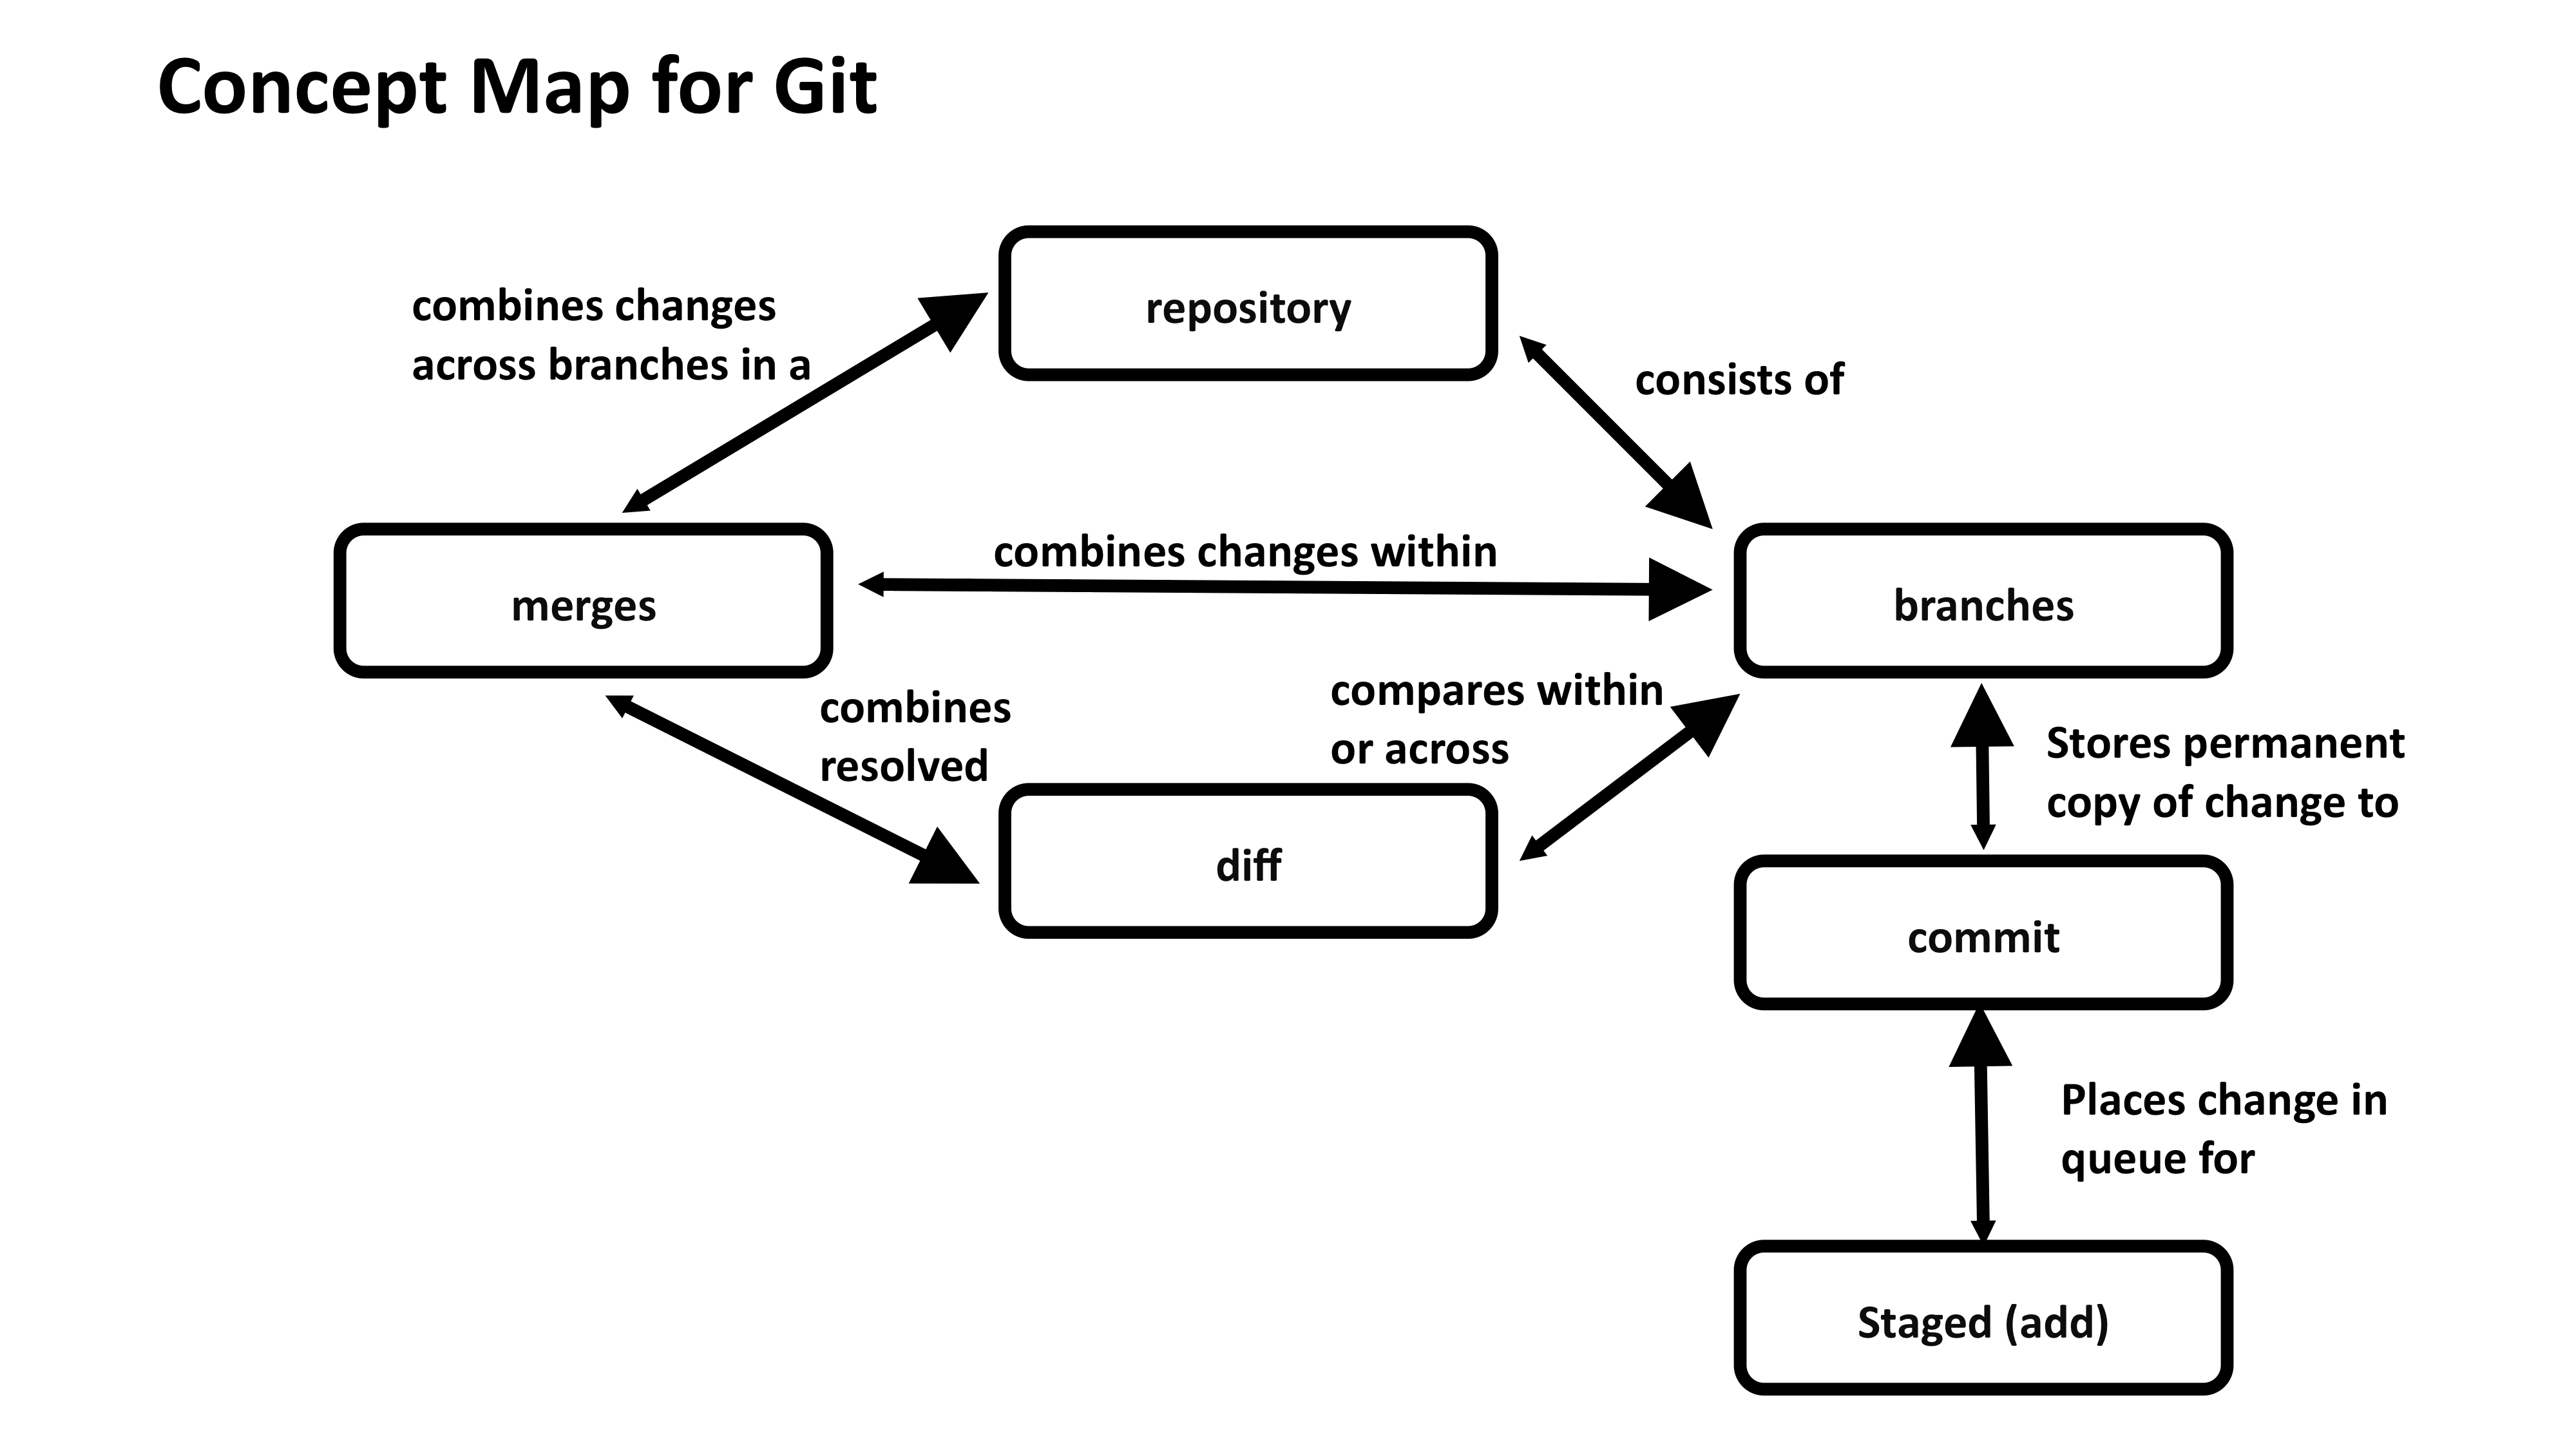
- Git Version Control
- Library Carpentry Foundations
Most of these are much larger than our recommended limit, but that’s not necessarily a bad thing. An instructor can draw a concept map for an entire topic, and use that to decide where to introduce a formative assessment to avoid overloading short-term memory.
It’s very important to use a technique like concept mapping for a lesson before teaching it - an instructor needs to identify just how many pieces of separate information will need to be “stored” in memory during each part of the lesson. This can be particularly useful for experts who are trying to unpack their own knowledge.
Concept Mapping
Create a hand-drawn concept map for a part of a Carpentry lesson you would teach in five minutes (i.e. the amount of material you would teach before doing a formative assessment). You can use the same subject about which you created a multiple choice question, or a different subject. Trade with a partner, and critique each other’s maps. Are there any concepts missing in your partner’s map that you would include? Are there more than a handful of concepts in your map? If so, how would you re-divide those concepts to avoid overwhelming your learners’ short-term memory?
Take 10 minutes to draw the concept maps and share with your neighbor. Write “done” in the Etherpad chat once you have finished.
Other Uses of Concept Maps
In addition to helping you plan where to introduce formative assessments, concept maps can be used in many other ways:
- To aid solo design of a lesson by helping authors figure out what they’re trying to teach.
- To aid communication with fellow lesson designers.
- To aid communication with learners. While it’s possible to give learners a pre-drawn map at the start of a lesson for them to annotate, it’s better to draw it piece by piece while teaching to reinforce the ties between what’s in the map and what the instructor said.
- Concept maps can be used as a classroom discussion exercise. Put learners in small groups (2-4 people each), give each group some sticky notes on which a few key concepts are written, and have them build a concept map on a whiteboard by placing those sticky notes, connecting them with labelled arcs, and adding any other concepts they think they need.
- Concept maps are also a useful formative assessment technique: having learners draw concept maps of what they think they just heard shows the instructor what was missed and what was misunderstood.
Why Guided Practice is Important
Another way to think about the challenge of managing memory is through the theory of cognitive load. It posits that people have to deal with three things when they’re learning:
- Intrinsic load is what they have to keep in mind in order to carry out a learning task.
- Germane load is the (desirable) mental effort required to create linkages between new information and old (which is one of the things that distinguishes learning from memorization).
- Extraneous load is everything else that distracts or gets in the way.
Cognitive load theory’s proponents claim that eliminating extraneous cognitive load accelerates learning. One way to do this is by using guided practice: we set up a structure in which learners can apply their skills with direction and get feedback on their progress.
Why We Don’t Use Minimal Guidance
An alternative to guided practice is a minimal guidance approach, where learners are given raw materials (for example a text or reference) and asked to explore and learn to solve problems on their own. Minimal guidance practice comes from another teaching strategy variously known as constructivist, discovery, problem-based, experiential or inquiry-based learning.
You may have heard of some of these strategies, and they are not without merit! But they frequently fall flat. Cognitive load theory, introduced by Kirshner et al. in response to the popularity and uneven success of these approaches, applies what we know about human cognitive architecture to understand why minimal guidance often fails.
Minimally-guided instruction requires learners to simultaneously master a domain’s factual content and its search and problem-solving strategies. Fostering creativity and independence is intuitively appealing, but that doesn’t mean it works.
In the framework of cognitive load, some additional predictions can be made.
One example is work by Mayer and colleagues on the split-attention effect. Linguistic and visual input are processed by different parts of the human brain, and linguistic and visual memories are stored separately as well. This means that correlating different linguistic, auditory, and visual streams of information takes cognitive effort: when someone reads one thing while hearing something else spoken aloud, their brain can’t help but check that it’s getting the same information on both channels. Discrepancies between these channels increase cognitive load and decrease learning. Learning is therefore more effective when information that is being presented simultaneously in two different channels is redundant, rather than different.
For our workshops, this means the instructor should say out loud commands as they type them on the screen while engaging learners in participatory live coding.
Guided Practice at Work
How do we implement guided practice, lessening the burden of extraneous cognitive load and allow people to focus on what’s important? There are many different types of exercises that implement this guided practice; some are listed in this blog post by Greg Wilson, including Parson’s Problems and labelling diagrams.
To learn more about a specific guided practice exercise called faded examples, read on.
According to cognitive load theory, searching for a solution strategy is an extra burden on top of applying that strategy. We can therefore accelerate learning by giving learners worked examples that show them a problem and a detailed step-by-step solution, followed by a series of faded examples. The first of these presents a nearly-complete use of the same problem-solving strategy with a small number of blanks for the learner to fill in. The next problem is also of the same type, but has more blanks, and so on until the learner is asked to solve the entire problem.
Faded examples work because they introduce the problem-solving strategy piece by piece. At each step, learners have one new problem to tackle. This is less intimidating than a blank screen or a blank sheet of paper. It also encourages learners to think about the similarities and differences between various approaches, which helps create the linkages in the mental model that instructors want them to form.
For example, someone teaching Python might start by explaining this:
def total_length(words):
    """Returns the total length of all words in a list combined.

    Example:
       total_length(["red", "green", "blue"]) => 12
    """
    total = 0
    for word in words:
        total += len(word)
    return total
then ask learners to fill in the blanks in:
def word_lengths(words):
    """Returns a list of lengths of each word in a list.

    Example:
        word_lengths(["red", "green", "blue"]) => [3, 5, 4]
    """
    lengths = ____
    for word in words:
        lengths ____
    return lengths
The next problem might be:
def concatenate_all(words):
    """Combines all words in a list into one.

    Example:
        concatenate_all(["red", "green", "blue"]) => "redgreenblue"
    """
    result = ____
    for ____ in ____:
        ____
    return result
and learners would finally be asked to tackle:
def acronymize(words):
    """Returns the first letter of each word in a list capitalised in a single string.

    Example:
        acronymize(["red", "green", "blue"]) => "RGB"
    """
    ____
Another situation in which a concept map can be helpful is in deciding where to place the blanks in a faded example. Each blank (or set of blanks) would ideally correspond to one concept in your concept map.
Create a Faded Example from a Lesson (Optional)
The following exercise should be done in groups of 2-3.
- Pick a block of code from an existing Carpentries lesson, or from another lesson you have taught recently.
- Replace 2-3 pieces of the code with a blank.
- Write a question to test the learner’s ability to correctly fill in that blank.
- Paste your faded example in the Etherpad.
This exercise should take about 10 minutes.
Solution
Your solution to this exercise could look similar to the example given above, or something like this:
Question
In this example, we will graph the change in life expectancy over time as a line graph, giving each country a unique color and each continent its own unique panel or facet.
What would you add to the blank spaces to create this graph?ggplot(data = az.countries, aes(x = year, y = lifeExp, color = ________)) + geom_line() + facet_wrap( ~ _______)Answer
countryandcontinent
Summary
The process of learning is constrained by the limits of short-term memory. In order to move new information into long-term memory, it must be actively applied, but activities that make excessive demands on short-term memory are likely to induce cognitive overload and can easily harm learner motivation. Instructional tools that expand short-term memory by increasing connectivity (chunking) among new concepts can improve outcomes for subsequent memory-intensive exercises. Formative assessments, when performed frequently, help learners by prompting them to apply new content before it has been overwritten. Faded examples or other types of guided practice both minimize demands on short-term memory and offer context that helps improve connectivity for future work, in which the “scaffolding” of contextual support can be gradually removed. Anything you can do to a) recognize and b) support learners in working with the limitations of short-term memory will improve the effectiveness of your teaching.
Keypoints:
- Most adults can store only a few items in short-term memory for a few seconds before they lose them again.
- Things seen together are remembered (or mis-remembered) in chunks.
- Teaching consists of loading short-term memory and reinforcing it long enough for items to be transferred to long-term memory.
- Use formative assessments to avoid overloading short-term memory.
-------------------------------------------------------
Building Skill With Feedback
https://denubis.github.io/instructor-training-8-sessions-DV-BBS-2020/05-feedback/index.html
Questions:
- How can I get feedback from learners?
- How can I use this feedback to improve my teaching?
Objectives:
- Describe three feedback mechanisms used in Carpentries workshops.
- Give feedback to your instructors.
We use formative assessment of learners during workshops to help track learners’ progress and adjust our approach to teaching the content as needed. But formative assessment isn’t just for learners. As we’ll discuss in more detail later, teaching is also a skill that is improved through regular practice and feedback. We gather feedback from our learners at multiple points in the workshop and in different forms.
Surveys
Carpentries learners fill out a survey before attending and immediately after a workshop. These surveys include questions to help instructors get an idea of their attendees prior experience and backgrounds before the workshop starts. Using this information, instructors can start to plan how they will approach the materials and what level of exercises are likely to be appropriate for their learners.
You can preview the surveys your learners will take at the links below:
Survey links
The survey links above are just for you to preview the survey as part of Instructor Training. When you are teaching a workshop, make sure to share the links that gets generated on your workshop website. Doing so will ensure that you will receive all the survey results from your workshop participants.
Timing Matters
We’ve found that learners are much more likely to fill out the post-workshop survey while they’re still at the workshop than they are after they leave the venue. At the end of a two-day workshop, your learners’ brains will be very tired. Rather than trying to fit in another 15 minutes worth of teaching, give your learners time to complete the post-workshop survey at the end of your workshop. You’ll be helping them (they get a bit of a rest), yourself (you’ll get more useful feedback), and the Carpentries.
Minute Cards
Before each lunch break and at the end of the first day, we use sticky notes as minute cards to get anonymous feedback from learners. Learners write one positive thing on their blue sticky note, and one negative thing on their yellow one. Instructors can change the prompt to elicit different types of feedback at each break.
Example “positive” prompts:
- What is the most important thing you learned today.
- What new skill are you most excited about using?
Example “negative” prompts:
- Write down one thing that is confusing and you’d like clarification on.
- What is one specific question you have about the material?
Over lunch and before the second day starts, the instructors read through the minute cards and look for patterns. At the start of day two and each afternoon, the instructors take a few minutes to address commonly raised issues with the whole class. The non-teaching instructor can also type answers to the questions in the Etherpad.
Be Explicit
Learners are more likely to give useful feedback if they feel that their feedback is being taken seriously. Spending a few minutes talking about the feedback you got and being explicit about what changes you’re making in light of that feedback will encourage learners to continue to give informative feedback throughout the workshop.
One-Up, One-Down
In addition to minute cards, we also ask learners to give us feedback at the end of each day using a technique called “one up, one down”. The instructor asks the learners to alternately give one positive and one negative point about the day, without repeating anything that has already been said. This requirement forces people to say things they otherwise might not: once all the “safe” feedback has been given, participants will start saying what they really think. The instructor writes down the feedback in the Etherpad or a text editor, but does not comment on the feedback while collecting it. The instructors then discuss this feedback and how they plan to act on it. Like with minute cards, be explicit about how you’re responding to learner feedback.
Give Us Feedback
Write one thing you learned this morning that you found useful on your blue sticky note, and one question you have about the material on the yellow. Do not put your name on the notes: this is meant to be anonymous feedback. Add your notes to the pile by the door as you leave for lunch.
Keypoints:
- Give your learners time to fill out the post-workshop survey at the end of your workshop.
- Take the time to respond to your learners' feedback.
-------------------------------------------------------
Wrap-Up and Homework for Tomorrow
https://denubis.github.io/instructor-training-8-sessions-DV-BBS-2020/05a-homework/index.html
Questions:
- What have we learned today?
- What needs to be done to prepare for tomorrow?
Objectives:
- Describe overnight homework.
- Produce a paragraph, drawing, or diagram that summarizes what was taught today.
Homework:
Weekend Homework: Choose an episode from any lesson in https://carpentries.github.io/instructor-training/demo_lessons/index.html and read through it, preparing to teach it.
Weekend Homework 2: Make a concept map (ideas below) and paste a screenshot/photo of it/link to it into the Google Doc
Draw a concept map for one of the following:
- Baking Bread
- Changing the oil on a car
- Doing the laundry
- Functions in R/python
- A Carpentries lesson you want to teach
- your choice!
We recommend preparing one of the following:
- Data Carpentry
- Library Carpentry
- Software Carpentry
Feedback
The Trainer(s) will ask for feedback on the day in some form.
https://limesurvey.mq.edu.au/index.php/756654?lang=en&newtest=Y
This exercise should take 5 minutes.
Reflecting on the Day
Before we wrap up for the day, take 5 minutes to think over everything we covered today. On a piece of paper, write down something that captures what you want to remember about the day. The Trainers won’t look at this - it’s just for you.
If you don’t know where to start, consider the following list for a starting point:
- draw a concept map, connecting the material
- draw pictures or a comic depicting one of the day’s concepts
- write an outline of the topics we covered
- write a paragraph or “journal” entry about your experience of the training today
- write down one thing that struck you the most
This exercise should take about 10 minutes.
Keypoints:
-------------------------------------------------------
Motivation and Demotivation
https://denubis.github.io/instructor-training-8-sessions-DV-BBS-2020/06-motivation/index.html
Questions:
- Why is motivation important?
- How can we create a motivating environment for learners?
Objectives:
- Identify authentic tasks and explain why teaching using them is important.
- Develop strategies to avoid demotivating learners.
- Recognize and overcome imposter syndrome in yourself and your learners.
In the morning we covered some educational research and how we can apply it to teaching Carpentries workshops. Part of this afternoon will cover another important aspect of being a Carpentries instructor: fostering a positive learning environment.
This section discusses typical ways that learners are motivated (and can be demotivated!) and provides practice opportunities for you to become confident in motivating your learners.
Creating A Positive Learning Environment
Creating a positive learning environment is an important first step to setting the stage for learner success. As instructors, it is crucial to establish the workshop setting as a safe space for learning. Establishing a safe space for learning is a combination of many factors:
- Presenting the instructor as a learner. Admitting that you don’t know everything is part of showing that it is acceptable to make mistakes, and encouraging a growth mindset in learners (we’ll talk much more about growth mindset in a later lesson). Using participatory live coding, our chosen method for teaching concepts, is very useful for this reason. It is common to make errors while coding. When handled transparently, these errors can be very instructive for novice learners.
- Establishing norms for interaction. This can be done by having, discussing, and enforcing a Code of Conduct or by having rules of interaction such as ensuring turn taking in discussions, possibly by passing around a talking stick, or by encouraging quieter people to contribute.
- Encouraging learners to learn from each other. Acknowledge that some of the material can be difficult and that they will learn more working together. Asking more advanced learners to help beginner learners is a good way to maximize learning for both.
- Acknowledging when learners are confused. Understanding why learners are confused provides useful feedback for instructors. We use formative assessments to pinpoint learners’ misunderstandings. Acknowledging that their misunderstandings are valid is also key to encouraging a growth mindset.
Teach Most Useful First
One way to build a positive classroom environment is to create a space that cultivates and encourages learners’ motivations.
People learn best when they care about a topic and believe they can master it. Many scientists might know vaguely the value of programming but find it intimidating, and struggle with how to get started. This presents us with a problem because believing that something will be hard to learn often becomes a self-fulfilling prophecy.
We have therefore adopted a “teach most immediately useful first” approach. We try to have learners do something that they think is useful in their daily work within 15 minutes of starting each lesson. This not only motivates them, it also helps build their confidence in us, so that if it takes longer to get to something they find useful in a later topic, they’ll persist with the lesson.
To do this, we as instructors need to go through the work of identifying what to teach first (or at all!). Imagine a graph whose axes are labelled “mean time to master” and “usefulness once mastered”. Everything that’s quick to master, and immediately useful should be taught first; things in the opposite corner that are hard to learn and have little near-term application don’t belong in our workshops.
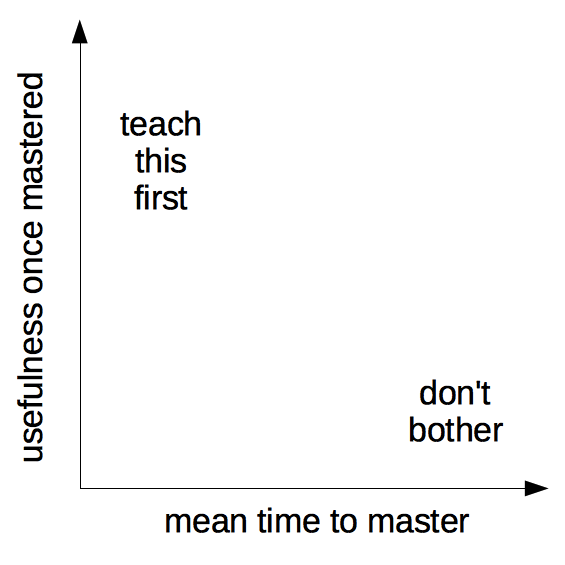
Another way to think about the graph shown above is “authentic tasks.” An authentic task is exactly what it sounds like – a real task performed by someone doing their work. If you can identify authentic tasks from your own work that could be useful to others, these examples will be highly motivating.
Authentic Tasks: Think, Pair, Share
Think about some task you did this week that uses one or more of the skills we teach, (e.g. wrote a function, bulk downloaded data, built a plot in R, forked a repo) and explain how you would use it (or a simplified version of it) as an exercise or example in class. Pair up with your neighbor and decide where this exercise fits on a graph of “short/long time to master” and “low/high usefulness”. In the class Etherpad, share the task and where it fits on the graph. As a group, we will discuss how these relate back to our “teach most immediately useful first” approach.
This exercise and discussion should take about 10 minutes.
Actual Time
Any useful estimate of how long something takes to master must take into account how frequent failures are and how much time is lost to them. For example, editing a text file seems like a simple task, but most graphical editors save things to the user’s desktop or home directory. If people need to run shell commands on the files they’ve edited, a substantial fraction won’t be able to navigate to the right directory without help. If this seems like a small problem to you, please revisit the discussion of expert awareness gap.
Other Motivational Strategies
In addition to teaching things that will make our learners’ lives easier and focusing on authentic tasks, there are a number of other strategies we can use to motivate learners.
Strategies for Motivating Learners
How Learning Works by Susan Ambrose, et al., contains this list of evidence-based methods to motivate learners.
In groups of two or three, pick three of these points and briefly describe in the Etherpad how we can apply these strategies in our workshops.
- Strategies to Establish Value
- Connect the material to learners’ interests.
- Provide authentic, real-world tasks.
- Show relevance to learners’ current academic lives.
- Demonstrate the relevance of higher-level skills to learners’ future professional lives.
- Identify and reward what you value.
- Show your own passion and enthusiasm for the discipline.
- Strategies to Build Positive Expectations
- Ensure alignment of objectives, assessments, and instructional strategies.
- Identify an appropriate level of challenge.
- Create assignments that provide an appropriate level of challenge.
- Provide early success opportunities.
- Articulate your expectations.
- Provide rubrics.
- Provide targeted feedback.
- Be fair.
- Educate learners about the ways we explain success and failure.
- Describe effective study strategies.
- Strategies for Self-Efficacy
- Provide learners with options and the ability to make choices.
- Give learners an opportunity to reflect.
This exercise and discussion should take about 5 minutes.
Provide an Example
Insert a personal story here about how you establish value in the classroom.
Or, insert an example story about establishing value, which goes like this:
“In the SWC Unix “Finding Things” episode, a haiku is used to to teach grep. This is a great didactic tool, but it can be hard for learners to see how it applies to research. After the didactic example, I connect my bioinformatics users with domain-specific examples by showing a list of one-line unix commands consisting of
grep,sort,head, anduniqto explore biological sequence data. This emphasizes how they can apply what they learned with haikus to real bioinformatics research problems.”
Brainstorming Motivational Strategies
Think back to a computational (or other) course you took in the past, and identify one thing the instructor did that motivated you. Pair up with your neighbor and discuss what motivated you. Share the motivational story in the Etherpad.
This exercise should take about 5 minutes.
Not Just Learners
What’s missing from this list is strategies to motivate the instructor. As we said in the introduction, learners respond to an instructor’s enthusiasm, and instructors need to care about a topic in order to keep teaching it, particularly when they are volunteers.
Why Do You Teach? (Optional)
We all have a different motivation for teaching, and that is a really good thing! The Carpentries want instructors with diverse backgrounds because you each bring something unique to our community.
What motivates you to teach? Write a short explanation of what motivates you to teach. Save this as part of your teaching philosophy for future reference.
This exercise should take about 5 minutes.
How Not to Demotivate Your Learners
Motivation can go both ways. Besides using strategies to motivate learners, one of our additional challenges as instructors is to not demotivate participants through our words or actions. None of us goes into a workshop with the intention of creating a hostile environment or making the learners hate the tools we’re teaching, but we can all accidentally do just that if we don’t pay attention to what we say and how we interact with our learners. We’ll discuss some common demotivators and help you develop strategies for avoiding them.
Brainstorming Demotivational Experiences
Think back to a time when you were demotivated as a student (or when you demotivated a student). Pair up with your neighbor and discuss what could have been done differently in the situation to make it not demotivating. Share your story in the Etherpad.
If time, what themes do you see among the stories? What are positive actions you could take to avoid these?
This exercise should take about 5 minutes.
Things You Shouldn’t Do in a Workshop
- Tell learners they are rubbish because they use Excel and/or Word, don’t modularize their code, etc.
- Say negative things about Windows and praise Linux, e.g., say that the former is for amateurs.
- Criticize GUI applications (and by implication their users) and describe command-line tools as the One True Way.
- Talk contemptuously or with scorn about any tool. Regardless of its shortcomings, many of your learners may be using that tool. Convincing someone to change their practices is much harder when they think you disdain them.
- Dive into complex or detailed technical discussion with the one or two people in the audience who clearly don’t actually need to be there.
- Pretend to know more than you do. People will actually trust you more if you are frank about the limitations of your knowledge, and will be more likely to ask questions and seek help.
- Use the J word (“just”) or other demotivating words we talked about in a previous lesson. These signal to the learner that the instructor thinks their problem is trivial and by extension that they therefore must be stupid for not being able to figure it out.
- Take over the learner’s keyboard. It is rarely a good idea to type anything for your learners. Doing so can be demotivating for the learner (as it implies you don’t think they can do it themselves or that you don’t want to wait for them). It also wastes a valuable opportunity for your learner to develop muscle memory and other skills that are essential for independent work.
- Feign surprise. Saying things like “I can’t believe you don’t know X” or “You’ve never heard of Y?” signals to the learner that they do not have some required pre-knowledge of the material you are teaching, that they don’t belong at the workshop, and it may prevent them from asking questions in the future. (For more on this see the Recurse Center’s Social Rules).
It can be difficult to avoid these demotivators entirely. Some people are so used to making fun of Windows-users with their friends, or talking about how terrible Excel is that they initially fail to realize they’re doing it while teaching. Teaching yourself to avoid these types of comments takes practice, but is well worth the effort. No one likes to be made fun of, and talking badly about people who use GUIs, or who aren’t writing their thesis in LaTeX is unlikely to make them excited about learning your favorite scripting language.
Systemic and Psychological Demotivators
As instructors, we can learn to avoid talking disparagingly about our learners’ choice of text editors and levels of technical knowledge. There are other factors, however, that contribute to demotivation, some of which are either systemic, or built into our psychological makeup as human beings. We can’t always control these demotivators - often they come from outside classrom - but we can be aware of them, and take certain actions to lessen their impact by thinking carefully about the language that we use and how we interact with our learners.
Stereotype Threat
One major psychological demotivator is stereotype threat. Reminding people of negative stereotypes, even in subtle ways, can make them anxious about the risk of confirming those stereotypes, in turn reducing their performance. This is called stereotype threat, and the clearest examples in computing are gender-related. Depending on whose numbers you trust, only 12-18% of programmers are women, and those figures have actually been getting worse over the last 20 years. There are many reasons for this (see Margolis and Fisher’s Unlocking the Clubhouse and Margolis’s Stuck in the Shallow End). Steele’s Whistling Vivaldi summarizes what we know about stereotype threat in general and presents some strategies for mitigating it in the classroom.
While there’s lots of evidence that unwelcoming climates demotivate members of under-represented groups, it’s not clear that stereotype threat is the underlying mechanism. Part of the problem is that the term has been used in many ways. Another is that there are questions about the replicability of key studies. What is clear is that we need to avoid thinking in terms of a deficit model (i.e., we need to change the members of under-represented groups because they have some deficit, such as lack of prior experience) and instead use a systems approach (i.e., we need to change the system because it produces these disparities). We can also not highlight people based on their identity with a minority group; for example, it’s not a good idea to say something like “I’m so glad you’re here because we don’t get enough women in programming.” That may sound positive, but draws attention to the stereotype that women aren’t good at programming.
Never Learn Alone
One way to support at-risk learners of all kinds is to ask people to sign up for workshops in small teams rather than as individuals when possible. If an entire lab group comes, or if attendees are drawn from the same (or closely-related) disciplines, everyone in the room will know in advance that they will be with at least a few people they trust, which increases the chances of them actually coming. Furthermore, if people attend a workshop with their labmates, it’s more likely they will work together to implement what they’ve learned after the workshop has ended.
Impostor Syndrome
Another major psychological demotivator is impostor syndrome. Imposter syndrome is the belief that one is not good enough for a job or position, and that one’s achievements are due to luck rather than talent or skill. This is also accompanied by the fear of being “found out”.
 https://xkcd.com/1954/
Academic work is frequently undertaken alone or in small groups but the results are shared and criticized publicly. In addition, we rarely see the struggles of others, only their finished work, which can feed the belief that everyone else finds it easy. Women and minority groups, who already feel additional pressure to prove themselves in some settings, may be particularly affected.
Two ways of dealing with your own impostor syndrome are:
- Ask for feedback from someone you respect and trust. Ask them for their honest thoughts on your strengths and achievements, and commit to believing them.
- Look for role models. Who do you know who presents as confident and capable? Think about how they conduct themselves. What lessons can you learn from them? What habits can you borrow? (Remember, they quite possibly also feel as if they are making it up as they go.)
As an instructor, you can help people with their impostor syndrome by sharing stories of mistakes that you have made or things you struggled to learn. This reassures the class that it’s OK to find topics difficult. Being open with the group makes it easier to build trust and make learners confident to ask questions. (Live coding is great for this: typos let the class see you’re not superhuman.)
You can also emphasize that you want questions: you are not succeeding as a teacher if no one can follow your class, so you’re asking learners to help you learn and improve. Remember, it’s much more important to be smart than to look smart.
The Ada Initiative has some excellent resources for teaching about and dealing with imposter syndrome.
Overcoming Imposter Syndrome (Optional)
Think of a time when learning something was difficult for you, or you made a mistake that seemed silly or embarrassing. Is that task still hard for you? In the Etherpad, describe how you might use this as a motivational story to help your learners overcome their own imposter syndrome.
This exercise should take about 5 minutes.
Accessibility Issues
Not providing equal access to lessons and exercises is about as demotivating as it gets. If you look at our old lesson on Python, for example, you’ll find that the text beside the slides includes all of the narration—but none of the Python source code. Someone using a screen reader would therefore be able to hear what was being said about the program, but wouldn’t know what the program actually was.
While it may not be possible to accommodate everyone’s needs, it is possible to get a good working structure in place without any knowledge of what specific disabilities people might have. Having at least some accommodations prepared also makes it clear that hosts and instructors care enough to have thought about problems in advance, and that any additional concerns are likely to be addressed.
It Helps Everyone
Curb cuts (the small sloped ramps joining a sidewalk to the street) were originally created to make it easier for wheelchair users to move around, but proved to be equally helpful to people with strollers and grocery carts. Similarly, steps taken to make lessons more accessible to people with various disabilities also help everyone else. Proper captioning of images, for example, benefits people with no or limited vision by giving screen readers something to say: but it also makes the images more findable by exposing their content to search engines.
The first step is to know what you need to do. There are a number of good resources for learning about accessibility.
Learning about Accessibility
The UK Home Office has put together a set of posters of dos and don’ts for making visual and web-based materials more accessible for different populations. Take a look at one of these posters and put one thing you’ve learned in the Etherpad.
Note: There are translations available in a number of languages, including Dutch, French, Spanish, Swedish, Portuguese, German, and Chinese.
This exercise should take about 5 minutes.
Accessibility and PDFs
The posters above are in PDF format - which itself can sometimes be inaccessible to people who use screen readers. If you know of a similar resource describing accessibility guidelines that would be more accessible than what’s linked above, open an issue on our instructor training curriculum respoistory here: https://github.com/carpentries/instructor-training/issues
The W3C Accessibility Initiative’s checklist for presentations is a good starting point focused primarily on assisting the visually impaired, while Liz Henry’s blog post about accessibility at conferences has a good checklist for people with mobility issues, and this interview with Chad Taylor is a good introduction to issues faced by those with no or limited hearing.
The second is to know how well you’re doing. For example, sites like WebAIM allow you to check how accessible your online materials are to users with no or limited vision.
The third, and most important, is to involve people with disabilities in decision-making. Our mailing lists are a good place to ask for advice, and updates to our accessibility checklist are always welcome.
What Happens When Accessibility is an Issue? (Optional)
Think of a time when you’ve been affected by, or noticed someone else being affected by issues with accessibility. This may have been at a conference you attended where the elevator was out of service, or maybe a class you were taking relied on audio delivery of content. Describe what happened, how it impacted your (or someone else’s) ability to be involved and what could have been done to provide better accessibility in this case.
This exercise should take about 5 minutes.
Every Little Bit Counts
Looking at people who work with disability and accessibility, it’s easy to be overwhelmed by all the different ways we could make instruction more accessible. Don’t panic. Instead:
- Don’t do everything at once. We don’t ask learners in our workshops to adopt all our best practices or tools in one go, but instead to work things in gradually at whatever rate they can manage. Similarly, try to build in accessibility habits when preparing for workshops by adding something new each time.
- Do the easy things first. There are plenty of ways to make workshops more accessible that are both easy and don’t create extra cognitive load for anyone: font choices, general text size, checking in advance that your room is accessible via an elevator or ramp, etc.
Accessibility Testing
Find the nearest public transportation drop-off point to your building and walk from there to your office and then to the nearest washroom, making notes about things you think would be difficult for a wheelchair user. Now borrow a wheelchair and repeat the journey. How complete was your list of challenges? And did you notice that the first sentence in this challenge assumed you could walk?
Inclusivity
Inclusivity is a policy of including people who might otherwise be excluded or marginalized. In computing, it means making a positive effort to be more welcoming to women, people of color, people with various sexual orientations, the elderly, people with physical disabilities, the formerly incarcerated, the economically disadvantaged, and everyone else who doesn’t fit Silicon Valley’s white/Asian male demographic. Lee’s paper “What can I do today to create a more inclusive community in CS?” is a brief, practical guide with references to the research literature. These help learners who belong to one or more marginalized or excluded groups, but help motivate everyone else as well.
Many of these can be applied to our workshops, such as:
- asking learners to email you before the workshop to explain how they believe the training could help them achieve their goals;
- reviewing notes to make sure they are free from gendered pronouns, that they include culturally diverse names, etc.;
- emphasizing that what matters is the rate at which they are learning, not the level of knowledge they had when they started;
- encouraging pair programming; and
- actively mitigating behavior that some learners may find intimidating, e.g., use of jargon or “questions” that are actually asked to display knowledge.
Setting Expectations with the Code of Conduct
Finally, a important way that the Carpentries foster an inclusive, respectful learning environment is our Code of Conduct.
To make clear what is expected, all participants in our workshops are required to conform to the Code of Conduct. Its details are important, but the most important thing about it is that it exists: knowing that we have rules tells people a great deal about our values and about what kind of learning experience they can expect.
We will discuss the Code of Conduct in greater detail tomorrow.
Keypoints:
- A positive learning environment helps people concentrate on learning.
- People learn best when they see the utility in what they're learning, so teach what's most immediately useful first.
- Imposter syndrome is a powerful force, but can be overcome.
- Accessibility benefits everyone.
-------------------------------------------------------
Mindset
https://denubis.github.io/instructor-training-8-sessions-DV-BBS-2020/07-mindset/index.html
Questions:
- How does mindset influence learning?
- How should we praise our learners?
- How should we talk about errors?
- What are successful habits of lifelong learners?
Objectives:
- Explain the difference between fixed and growth mindset and its implications for classroom performance.
- Develop strategies for giving effort-based and improvement-based praise.
- Respond positively to learner errors.
- Model habits of lifelong learners.
Our beliefs and attitudes about learning can impact how we learn! In this section we examine how learners can create a “positive learning environment” for themselves by how they think about learning; and how to model these behaviors as an instructor.
The Importance of Mindset
One example of how our beliefs impact learning is Carol Dweck’s theory of “mindset”.
Dweck, a professor of Psychology at Stanford University, has conducted decades of research focused on understanding people’s attitudes towards ability, our beliefs about whether ability is ingrained or developed, and how those beliefs affect our perseverance in learning. She’s discovered that, in any given area, people tend to have either a fixed mindset - believing that someone’s ability in that area is intrinsic, you’re either born with it or you’re not - or a growth mindset - believing that, with enough effort, almost anyone can learn almost anything. (She’s written a very accessible popularized summary of her findings. There’s also a short summary available.)
Do you believe that you’re just not good at math? Or maybe you’re not artistic? Not good at sports? If any of these sound like you, you probably have a fixed mindset when it comes to mathematical, artistic and/or athletic ability. People with a fixed mindset tend to avoid effort and to give up when faced with failure or challenge. They also tend to take fewer risks, be less likely to take an opportunity to learn something new and to feel best about themselves when they perform flawlessly. In contrast, people with a growth mindset tend to actively seek challenges and to work harder when faced with failure. They regularly take risks and take advantage of opportunities for learning new skills. In fact, initial difficulties in a topic make them more interested and motivated to learn!
People who believe that ability is intrinsic view every situation as a test. A failure indicates that they don’t have the natural ability they need to succeed. Thus, students with a fixed-mindset will decrease their study time after receiving a poor exam score, because they see this score as a judgment that they aren’t good at that subject and shouldn’t waste their time trying. In the same situation, a growth-mindset student will increase the amount of time that they study, seeing the poor score as an indication that they need to try harder to improve in that area.
Their attitude towards failure leads fixed-mindset people to avoid situations where they will be required to perform. They will not volunteer to answer questions in class or to demonstrate a sports technique to their team. This tendency prevents fixed-mindset people from using opportunities to practice and receive feedback, which, as we’ve discussed, is essential to learning.
Does Mindset Matter?
Think: What kind of mindset do you have about different areas? Is there anything you believe you are “not naturally talented” at? Mindset often varies in different areas – someone might have a fixed mindset with respect to artistic ability, but a growth mindset with respect to computing skill. Then, think about your learners. How might a learner’s mindset about computational skill influence their learning in a workshop setting?
Pair: Discuss your thoughts about the influence of mindset in a workshop. Try to come up with a few different ways or situations in which mindset might be relevant.
Share: A few thoughts in the Etherpad (or go around the room and discuss)
This exercise should take about 5 minutes.
If you recognize aspects of the fixed mindset in yourself, don’t panic! Like everything else, a growth mindset can be learned. We’re going to talk about some strategies that will help you promote a growth mindset in your learners and yourself.
Praise Influences Mindset
One specific way in which instructors can foster a growth mindset in learners is in how we praise. Carol Dweck’s research investigated three types of praise: performance-based, effort-based and improvement-based, and looked at how these types of praise influence learner’s mindsets.
We’re most used to hearing performance-based praise. This sort of praise focuses on outcomes and implies that the outcome (for example, getting a correct answer) is the most important part of the task. It is often (but not always) combined with language that explicitly or implicitly supports the “intrinsic” model of competence. For example, “You did a great job! You must be very smart.”
Effort-based praise focuses on the learner’s hard work. For example, “You did a good job, you must have worked very hard.” Exposing learners frequently to this type of praise helps them to transition from a fixed mindset to a growth mindset by changing their perception of effort. For fixed-mindset people, if something doesn’t come easy to you, it means that you don’t have natural ability and shouldn’t bother. People with a growth mindset are much more likely to persevere in the face of challenge and accomplish their goals.
Improvement-based praise is related to praise based on effort, but explicitly draws a learner’s attention to the progress they’ve made. For example, “You’re doing so much better at this than last time, you must have worked very hard.” This helps reinforce a growth-mindset by highlighting our ability to improve with effort.
Choosing our Praises
Since we’re so used to being praised for our performance, it can be challenging to change the way we praise our learners. Which of these are examples of performance-based, effort-based, or improvement-based praise?
- I like the way you tried a couple of different strategies to solve that problem.
- You’re getting really good at that. Keep up the hard work!
- You’re really good at that.
- That was a hard problem. You didn’t get the right answer, but look at how much you learned trying to solve it!
- You’re a natural!
Solution
- Effort-based.
- Improvement-based.
- Performance-based.
- Improvement-based.
- Performance-based. Explicit reference to ‘intrinsic’ ability.
Errors are Essential to Learning
The typos are the pedagogy. — Emily Jane McTavish
Another example of how our beliefs (in this case, our emotions) impact learning is in how we think about errors. One of the barriers to learning is avoidance of making errors. Errors are associated with negative emotions, which leads to learners being fearful of making them.
Positive error framing is the process of presenting errors as an integral part of the learning process and using them as teaching opportunities. Error framing encourages learners to understand that making errors provides valuable learning opportunities instead of having negative consequences. For example, the Language Acquisition Made Practical (LAMP) system for learning language encourages learners to develop phrases and try them in a variety of social situations with native speakers. By being willing to make mistakes, LAMP learners receive useful feedback from native speakers in real-world social situations. Error framing has shown to be useful in learning complex tasks such as programming. In one study, Steele-Johnson showed that error framing showed positive effects on metacognition and self-efficacy.
How can we incorporate error framing into our lessons? We need to reduce the negative emotions associated with errors, instead casting errors as a “natural part of learning”. Sharing experiences of learning from errors can encourage learners to adopt a growth-mindset. Associating improvement-based praise with errors can also encourage positive emotions associated with making errors in learning. Finally, the use of participatory live coding as the focus for teaching allows for instructors to model how errors can be positively framed and the process for overcoming them.
Helping Learners Learn From Mistakes (optional)
A learner at your workshop asks for your help with an exercise and shows you their attempt at solving it. You see they’ve made an error that shows they misunderstand something fundamental about the lesson (for example, in the shell lesson, they forgot to put a space between
lsand the name of the directory they are looking at). What would you say to the learner?In the Etherpad, describe the error your learner has made and how you would respond.
This exercise and discussion should take about 5 minutes.
Perseverance Predicts Success
Finally, have you ever thought about how the quality of persistence can impact someone’s learning?
Angela Duckworth, a Psychology professor from University of Pennsylvania, suggests that something called grit is an essential trait in learning. Grit can be defined as perseverance and passion in the face of difficulty towards a defined long term goal. Learners with grit are willing to fail in their pursuit if they feel that it gets them closer to their goal. Learning and recovering from failure is an essential skill in many fields. Learners with grit have shown to have a higher degree of success later on in life. However, grit is not an innate trait; there is much evidence that suggests that grit is a trait that can be learned and instilled in learners.
There are many ways we can help our learners attain grit.
- Modeling resilience by sharing experiences of struggle. Sharing your own experiences of having difficulty learning certain computing concepts may help learners understand that the process of learning can be difficult. Sharing failures that were learning experiences may aid in modeling resilience.
- Promoting Perseverance. Part of grit is being able to push through even when things are difficult. Improvement-based praise is an important motivating tool to promote perseverance.
- Sharing Passion. Talking about why you persist in working in your field despite the difficulties and challenges is another way to instill grit.
- Emphasizing Long-Term Goals. Showing the effects of learning the concepts in terms of learners’ individual long-term goals can instill passion and drive for learning despite the difficulties of the topic.
How Are You Gritty? (Optional)
A previous exercise asked you to think of a time when learning something was difficult for you, or you made a mistake that seemed silly or embarrassing.
How did you motivate yourself to continue learning? How did it feel to persist in the face of challenge? How do you feel now about your capabilities in this area?
In the Etherpad, describe how you could use this story to illustrate the importance of grit for your learners.
This exercise should take about 5 minutes.
Habits of Lifelong Learners
Adopting beliefs and qualities like those listed above will help people become lifelong learners. By helping learners develop the habits of lifelong learning, we are not only preparing them to learn beyond the workshop, but hopefully, contributing to their overall career success. Surviving the job market nowadays requires the ability to be a lifelong learner, in order to learn and adapt to new skills that may be required by employers. Many of these positions can be described as Knowledge Work, work that requires “non-routine” problem solving. Knowledge workers need to be capable of what Cal Newport calls “deep work”: defined as the “ability to focus intensely on cognitively demanding tasks”.
Lifelong learning arises from those who have the growth mindset. Both grit and curiosity have been identified as success factors in lifelong learning. Often, the process of learning is a difficult journey. By modeling “gritty” behavior and how it has helped us achieve long-term goals, we can foster a “learn-it-all” rather than a “know-it-all” attitude in learners.
Emphasizing the role of help-seeking behavior in the lifelong learning process is important, as it is a critical skill of lifelong learners. Encouraging learners to seek help can be difficult when societal norms view seeking help as “stigmatizing, self-threatening behavior”. Because of this, we need to reframe help-seeking behavior as a positive behavior to cope with difficulties. Part of this reframing can be modeled by instructors emphasizing that they are also lifelong learners and by admitting the limits of their knowledge. Emphasizing that one’s cohort is a powerful source of help is important to establishing a positive learning community.
Keypoints:
- Growth mindset and grit promote learning by making effort a positive thing.
- Presenting errors as essential to the learning process helps learners learn from their mistakes.
- Successful lifelong learners aren't embarrassed to ask for help.
-------------------------------------------------------
Wrap-Up and Homework for Tomorrow
https://denubis.github.io/instructor-training-8-sessions-DV-BBS-2020/07a-homework/index.html
Questions:
- What have we learned today?
- What needs to be done to prepare for tomorrow?
Objectives:
- Describe overnight homework.
- Produce a paragraph, drawing, or diagram that summarizes what was taught today.
Homework:
Weekend homework: Review episode from prior week, and prepare to teach a live-coding segment from it. Read: Ten Quick Tips for Creating an Effective Lesson
Feedback
The Trainer(s) will ask for feedback on the day in some form.
This exercise should take 5 minutes.
Reflecting on the Day
Before we wrap up for the day, take 5 minutes to think over everything we covered today. On a piece of paper, write down something that captures what you want to remember about the day. The Trainers won’t look at this - it’s just for you.
If you don’t know where to start, consider the following list for a starting point:
- draw a concept map, connecting the material
- draw pictures or a comic depicting one of the day’s concepts
- write an outline of the topics we covered
- write a paragraph or “journal” entry about your experience of the training today
- write down one thing that struck you the most
This exercise should take about 10 minutes.
Keypoints:
-------------------------------------------------------
Teaching is a Skill
https://denubis.github.io/instructor-training-8-sessions-DV-BBS-2020/08-practice-teaching/index.html
Questions:
- How can I improve my teaching?
Objectives:
- Use peer-to-peer lesson practice to transform your instruction.
- Give thoughtful and useful feedback.
- Incorporate feedback into your teaching practices.
So far, we’ve focused on how we can be effective instructors by understanding how people learn and how to create a positive classroom environment, covering two of our primary goals in helping you become a certified Carpentries instructor. Now our focus will shift to developing additional teaching skills that you can use in a Carpentries workshop setting, starting with the process of “lesson study”, or teaching observation and feedback.
Lesson Study: Applying a Growth Mindset to Teaching
We’ve seen that providing opportunities for practice and giving useful feedback to learners are essential components in the learning process. Learning to teach is no different.
However, many people assume that teachers are born, not made. From politicians to researchers and teachers themselves, most reformers have designed systems to find and promote those who can teach and eliminate those who can’t. As Elizabeth Green describes in Building a Better Teacher, though, that assumption is wrong, which is why educational reforms based on it have repeatedly failed.
To assume that teaching is an “inherited” or innate skill is to take on a fixed mindset about teaching. A growth mindset believes that anyone can become a better teacher by the same methods we use to learn any subject – reflective practice. More specifically, instructors develop teaching skill over time through practice and improve most when given feedback on their performance from other instructors who share their pedagogical model.
We know that teachers can learn how to teach because of research done on the Japanese method of jugyokenkyu or “lesson study.”
In the 1980s and 90s, an educational psychologist named James Stigler observed teachers in the US and Japan. In the OECD’s annual rankings of countries’ educational achievements, Japanese students routinely test near the top in reading, math and science, while American students rank at or below average.
Looking at differences in teaching methods, Stigler found that American teachers met at most once a year to exchange ideas about teaching, compared to the weekly or even daily meetings of Japanese teachers. During these meetings, teachers in the US described their lessons to each other, but they did not observe each others’ teaching in practice. In contrast, Japanese teachers regularly conducted lesson study: observing each other at work, discussing the lesson afterward, and studying curriculum materials with their colleagues.
The situation is different in many English-language school systems: in the US, Canada, the UK, Australia, and elsewhere, where often what happens in the classroom stays in the classroom. Teachers aren’t able to watch each other’s lessons on a regular basis, so they can’t borrow each other’s good ideas. The result is that every teacher has to invent teaching on their own. They may get lesson plans and assignments from colleagues, the school board, a textbook publisher, or the Internet, but each teacher has to figure out on their own how to combine that with the theory they’ve learned in their educational programs to deliver an actual lesson in an actual classroom for actual learners. When teachers don’t observe each other teaching, the tricks and techniques that each instructor has painstakingly incorporated into their practice don’t have the opportunity to spread, limiting forward momentum on system-wide improvements to teaching.
Reading It Isn’t Enough
Several research studies (in 2007, 2012, and 2015) have shown that teachers don’t adopt instructional practices based on reports about the effectiveness of those practices. Social norms, institutional culture, and lack of time and support prevent many teachers from moving out of their accustomed teaching habits. Change in teaching doesn’t come about through reading about new teaching practices, but by seeing these practices in action, practicing them and getting feedback from other instructors.
Therefore, just like other disciplines (sports and music are two good examples), teachers benefit from closely observing the work of others. The Carpentries pedagogical model supports lesson study by providing many opportunities for our instructors to learn from each other. In this training workshop, you will have opportunities to practice teaching for one another and to give each other feedback. You’ll also have the opportunity to practice in front of an experienced instructor as part of your instructor training checkout. In addition, Carpentries instructors always teach in pairs (or more), giving you the opportunity to learn by observing and to get feedback from your fellow instructors.
Giving Feedback
We’ll start by observing some examples of teaching and providing some feedback.
Watch this example teaching video as a group and then give feedback on it. Put your feedback in the Etherpad. Organize your feedback along two axes: positive vs. negative and content (what was said) vs. presentation (how it was said). This exercise should take about 10 minutes.
Now that you’ve had some practice observing teaching and giving feedback, let’s practice with each other.
Feedback on Yourself
The goal of this exercise is to practice giving and receiving feedback, so don’t be overly concerned about creating a perfectly polished presentation. We don’t give you a lot of time to prep and the teaching time is short, so embrace the challenge (and improvisation) of the exercise and see what you can learn by watching other people teach, thinking about how to give them feedback, and how it feels to get feedback on your own teaching.
Trainings where trainees are co-located:
- Split into groups of three.
- Individually, spend 5 minutes preparing to teach a 90-second segment of the lesson episode you chose before the start of the training course. You will not be live coding; you can use a whiteboard or other visual aids if available (but this is not required!). We recommend using this 90 second teaching moment to introduce the topic of your lesson.
- Get together with your group and have each person teach their segment to the group, while one person records this (video and audio) using a cell phone or some other handheld device. Keep a strict time limit of 90 seconds per person (one person should be responsible for the timekeeping).
- After the first person finishes, rotate roles (they become the videographer, the audience becomes the instructor, the person who was recording becomes the audience) and then rotate roles again.
- After everyone in the group of three has finished teaching, watch the videos as a group. Everyone gives feedback on all three videos, i.e., people give feedback on themselves as well as on others.
- After everyone has given feedback on all of the videos, return to the main group and put everyone’s feedback about you into the Etherpad.
Distributed trainings: Your Trainer will split the group into virtual break-out rooms. Follow the instructions above but do not record each other. Instead, give each person feedback immediately after they finish their turn teaching. Also with in this setup one person should be responsible for the timekeeping.
This exercise should take about 25 minutes.
Feedback Is Hard
Sometimes it can be hard to receive feedback, especially negative feedback.

Feedback is most effective when the people involved share ground rules and expectations. In Carpentries teaching, we use the 2x2 paradigm for feedback. Each person giving feedback is expected to provide at least one piece of negative and one piece of positive feedback each for content and delivery. This helps overcome two common tendencies when giving feedback on teaching: to focus on the content (even though delivery is at least as important) and to either provide only negative or only positive feedback.
Here is a list of different ways that you can set the stage for receiving or providing feedback in a way that facilitates growth.
-
Initiate feedback as the instructor. It’s better to ask for feedback than to receive it unwillingly.
-
Ask for and give specific feedback. See a great example of this from this Lunar Baboon comic:

As an instructor one way to get specific feedback is to provide questions that focus the responses. Writing your own feedback questions allows you to frame feedback in a way that is helpful to you - the questions below reveal what didn’t work in your teaching, but read as professional suggestions rather than personal judgments. For example:
- “What is one thing I could have done as an instructor to make this lesson more effective?”
-
“If you could pick one thing from the lesson to go over again, what would it be?”
- Balance positive and negative feedback.
- Ask for or give “compliment sandwiches” (one positive, one negative, one positive)
- Ask for both types of feedback, and give both types.
-
When sharing negative feedback, provide a clear next step to follow that will help the recipient improve.
-
Communicate expectations. If your teaching feedback is taking the form of an observation (and you’re comfortable enough with the observer), tell that person how they can best communicate their feedback to you.
-
When giving feedback, remember that giving and receiving feedback is a skill that requires practice, so don’t be frustrated if your feedback is rejected but try to think about why the recipient might not have been comfortable with the feedback you gave.
- Use a feedback translator. Have a fellow instructor (or other trusted person in the room) read over all the feedback and give an executive summary. It can be easier to hear “It sounds like most people are following, so you could speed up” than to read several notes all saying, “this is too slow” or “this is boring”.
This is part of the reason for the Carpentries’ rule, “Never teach alone.” Having another instructor in the classroom saves your voice (it’s hard to talk for two days straight), but more importantly, it’s a chance for instructors to learn from one another and be a supportive voice in the room.
Finally, be kind to yourself. If you’re a self-critical person, it’s OK to remind yourself:
- The feedback isn’t personal.
- There are always positives along with the negatives.
Feedback on Feedback (Optional)
Watch either this scipy tutorial (8:40) or this other tutorial (11:42). For each, give feedback following the 2x2 model. Put your feedback in the Etherpad.
This exercise and discussion should take about 15 minutes.
Using Feedback
Look back at the feedback you received on your teaching in an earlier exercise. How do you feel about this feedback? Is it fair and reasonable? Do you agree with it?
Identify at least one specific change you will make to your teaching based on this feedback. Describe your change in the Etherpad.
This exercise should take about 5 minutes.
Hopefully you were able to identify at least one helpful comment in the feedback you received and are able to use it to start (or continue) the process of improving your teaching. Remember, teaching is a skill that is learned. If you notice yourself feeling hurt or threatened by the feedback you got, or rejecting it as unfair or wrong, pause and try to consider the feedback from a growth mindset - that through practice and feedback, your skills are going to improve. By strengthening your growth mindset with respect to teaching, you can transform getting feedback from an unpleasant experience to a richly rewarding one. You’ll have more opportunities to practice teaching and to get and give feedback tomorrow.
Optional Exercises
Skill Acquisition: What level are your teaching skills?
As with computational skills, people have a tendency to think of teaching as something you are “just good at” or not. However, teaching is a skill, and expertise develops with attentive practice. Examine the descriptions of “novice,” “competent practitioner,” and “expert.” Where do you think you fall with regard to teaching? What have you learned about teaching? What are you aware of that you still need to learn? Discuss with a partner and then write some thoughts in the Etherpad.
Keypoints:
- Like all other skills, good teaching requires practice and feedback.
- Lesson study is essential to transferring skills among teachers.
- Feedback is most effective when those involved share ground rules and expectations.
-------------------------------------------------------
Live Coding is a Skill
https://denubis.github.io/instructor-training-8-sessions-DV-BBS-2020/09-live/index.html
Questions:
- Why do we teach programming using participatory live coding?
Objectives:
- Explain the advantages and limitations of participatory live coding.
- Summarize the key dos and don'ts of participatory live coding.
- Demonstrate participatory live coding.
One of the cornerstones of the Carpentries teaching is live coding: instructors don’t use slides, but work through the lesson material, typing in the code or instructions, with the workshop participants following along. This section explains how it works, why we use it, and gives general tips for an effective participatory live coding presentation. We’ll finish this section by practicing ourselves and providing feedback for each other.
Why Participatory Live Coding?
We do not use slides in our lessons. Instead, instructors plug their laptop into the projector and work through the lesson, typing in the code, reformatting data, and talking as we go. This is called “live coding”. However, the instructor is not live coding in a vacuum. Importantly, learners are strongly encouraged to “code-along” with the instructor. We refer to the practice of having the instructor live code and the learners code along as “participatory live coding” or, less formally, ‘code-along sessions’.
Up and Down
List some advantages and challenges of participatory live coding from both a learner’s and an instructor’s point of view in the Etherpad.
This discussion should take about 10 minutes.
Solution
Some advantages are:
- Watching a program being written is more compelling than watching someone page through slides that present bits and pieces of the same code.
- It enables instructors to be more responsive to “what if?” questions. Where a slide deck is like a railway track, participatory live coding allows instructors to go off-road and follow their learners’ interests.
- Lateral knowledge transfer: participatory live coding facilitates the transfer of tacit knowledge – people learn more than we realized we were teaching by watching how instructors do things.
- It slows the instructor down: if she has to type in the program as she goes along, she can only go twice as fast as her learners, rather than ten-fold faster as she could with slides.
- Learners get to see instructors’ mistakes and how to diagnose and correct them. Novices are going to spend most of their time doing this, but it’s left out of most textbooks.
Some challenges are:
- It requires instructors to be able to improvise when things go wrong or when learners have questions not directly addressed in the text of the lesson.
- It can be hard for learners to listen and type at the same time, due to the
split-attention effect we discussed earlier. This is why it’s very important that instructors first explain what they’re going to do, then say what they are typing as they type it, and then explain what they did again afterwards.- It may take a bit of practice for instructors to get used to thinking aloud while coding in front of an audience.
Live coding fits well into the practice-feedback model we’ve been discussing - by providing learners with continuous opportunities for practice (every time they type in a line of code) and continuous feedback (their code either works or fails with an error message). It’s important to keep in mind, however, that feedback isn’t helpful if you can’t understand it. Many error messages are obscure and not written with novices in mind. Continue to use the strategies for error framing that we learned earlier to make sure this feedback is useful to learners.
Compare and Contrast
Watch this first participatory live coding demo video and this second demo video as a group and then summarize your feedback on both in the Etherpad. Use the 2x2 rubric for feedback we discussed earlier.
In the videos, the bash shell
forloop is taught, and it is assumed learners are familiar with how to use a variable, theheadcommand and the content of thebasilisk.dat unicorn.datfiles.Note: Sometime sounds in the room can be poor. Turning on closed captioning by pressing the cc button will improve the accessibility of these videos.
This exercise and discussion should take about 15 minutes.
Solution
The instructor will lead a discussion about the videos and your feedback on them, making sure that the points of the Top Ten Tips below have been made.
Top Ten Tips for Participatory Live Coding in a Workshop
- Stand up and move around the room if possible. This makes the experience more interactive and less monotonous. Use a microphone if one is available to make it easier for people with hearing difficulties to hear you.
- Go slowly. For every command you type, every word of code you write, every menu item or website button you click, say out loud what you are doing while you do it. Then point to the command and its output on the screen and go through it a second time. This slows you down and allows learners to copy what you do, or to catch up. Do not copy-paste code.
- Mirror your learner’s environment. Try to create an environment that is as similar as possible to what your learners have to reduce cognitive load. Avoid using keyboard shortcuts.
- Use your screen wisely. Use a big font, and maximize the window. A black font on a white background works better than a light font on a dark background. When the bottom of the projector screen is at the same height, or below, the heads of the learners, people in the back won’t be able to see the lower parts. Draw up the bottom of your window(s) to compensate. Pay attention to the lighting (not too dark, no lights directly on/above the presenter’s screen) and if needed, re-position the tables so all learners can see the screen, and helpers can easily reach all learners.
- Use illustrations to help learners understand and organize the material. You can also generate the illustrations on the board as you progress through the material. This allows you to build up diagrams, making them increasingly complex in parallel with the material you are teaching. It helps learners understand the material, makes for a more lively workshop and gathers the learners’ attention to you as well.
- Turn off notifications on your laptop and phone.
- Stick to the lesson material. The core Carpentries lessons are developed collaboratively by many instructors and tried and tested at many workshops. This means they are very streamlined - which is great when you start teaching them for the first time. It may be tempting to deviate from the material because you would like to show a neat trick, or demonstrate some alternative way of doing something. Don’t do this, since there is a fair chance you’ll run into something unexpected that you then have to explain. If you really want to use something outside of the material, try it out thoroughly before the workshop: run through the lesson as you would during the actual teaching and test the effect of your modification. Some instructors use printouts of the lesson material during teaching. Others use a second device (tablet or laptop) when teaching, on which they can view their notes and the Etherpad session. This seems to be more reliable than displaying one virtual desktop while flipping back and forth to another.
- Leave no learner behind. Use sticky notes, see below, to gauge learners’ progress and understanding.
- Embrace mistakes. No matter how well prepared you are, you will make mistakes. This is OK! Use these opportunities to do error framing and to help your learners learn the art of troubleshooting.
- Have fun! It’s OK to use humor and improvisation to liven up the workshop. This becomes easier when you are more familiar with the material, and more relaxed. Start small, even just saying ‘that was fun’ after something worked well is a good start.
Sticky Notes
Give each learner two sticky notes of different colours, e.g., yellow and blue. If someone has completed an exercise, they put the blue sticky note on their laptop; if they run into a problem and need help, the put up the yellow one. This is better than having people raise their hands because:
- it’s more discreet (which means they’re more likely to actually do it),
- they can keep working while their flag is raised, and
- the instructor can quickly see from the front of the room what state the class is in.
Sometimes a yellow sticky involves a technical problem that takes a bit more time to solve. To prevent this issue slowing down the whole class too much, you could use the occasion to take the small break you had planned to take a bit later, giving the helper(s) time to fix the problem.
Remind learners frequently about using their sticky notes, or they (and you) will forget.
Accessibility of Sticky Notes
We strongly encourage you to get sticky notes in colors other than red and green, as we have found that some learners (not to mention helpers and instructors!) may have colorblindness and thus cannot properly ask for/give help this way. Alternate ideas are to use differently-shaped sticky notes (stars and squares, thumbs up that can be turned into thumbs down stickies), or to use one sticky note as a flag for help.
Practice Teaching
Teach 3 minutes of your chosen lesson episode using live coding to one or two fellow trainees, then swap and watch while the other person(s) live codes for you. (For this exercise, your peers will not “code-along”, but will instead observe and give feedback.)
Explain in advance to your fellow trainee(s) what you will be teaching and what the learners you teach it to are expected to be familiar with.
Don’t record this exercise. Give each other feedback using the 2x2 rubric we discussed previously and enter the feedback you received in the Etherpad.
This exercise should take about 25 minutes.
Keypoints:
- Live coding forces the instructor to slow down.
- Coding-along gives learners continuous practice and feedback.
- Mistakes made during participatory live coding are valuable learning opportunities.
-------------------------------------------------------
Preparing to Teach
https://denubis.github.io/instructor-training-8-sessions-DV-BBS-2020/10-preparing-teach/index.html
Questions:
- How should I prepare to teach?
Objectives:
- Use a learner profile to think about someone likely to attend a workshop you will teach.
- Classify the level of a learning objective in terms of Bloom's taxonomy.
- Critically analyze a Carpentries lesson's objectives.
- Describe reverse instructional design and explain why this is useful when preparing to teach.
- Identify checkpoints in a lesson for formative assessment.
- Recognize instructor notes as a resource for preparation.
Yesterday we started a discussion of the importance of lesson study. We started out by focusing on the lessons we can learn as instructors from watching others teach, having others observe our teaching, and giving and receiving feedback based on these observations. In this section, we’ll switch our focus to another important part of lesson study: detailed discussion of curricular components (including lesson objectives, contents, and exercises) with an eye toward actively preparing to teach a workshop.
Learner Profiles
To teach effectively, you have to know who you are teaching. Your audience can be identified in many ways. Frequently people who are hosting a workshop have a specific audience in mind, based on their own experience.
One “creative” way to think deeply about the audience for a workshop is to take a few moments to write learner profiles. Learner profiles have three parts: the person’s general background, the problem they face, and how the course will help them. One example of a learner profile for a Software Carpentry workshop might be:
João is an agricultural engineer doing his masters in soil physics. His programming experience is a first year programming course using C. He was never able to use this low-level programming in his activities, and never programmed after the first year.
His work consists of evaluating physical properties of soil samples from different conditions. Some of the soil properties are measured by an automated device that sends logs in a text format to his machine. João has to open each file in Excel, crop the first and last quarters of data values, and calculate an average.
Software Carpentry will show João how to write shell scripts to count the lines and crop the right range for each file, and how to use R to read these files and calculate the required statistics. It will also show him how to put his programs and files under version control so that he can re-run analyses and figure out which results may have been affected by changes.
Learner Profiles
Read Software Carpentry’s learner profiles. Note that these example profiles contain more information than you will ever know about a learner; this is a creative exercise in imagining (and empathizing with) the whole people behind the faces. Now, sketch out a profile of someone you might expect to attend your first workshop. Who are they, what problems do they face, and how might this training help them? Be as specific as possible.
Enter your learner profile into the Etherpad.This exercise should take about 10 minutes.
Reverse Instructional Design (and Preparation!)
When sitting down to plan a course or workshop, it might be tempting to dive into reviewing the content, questioning your understanding, and anticipating questions that learners might have for you. While it is good to prepare your content, this approach can take you down extended rabbit-holes in which you anticipate and research questions that only an expert would think to ask, and never get around to thinking about how to get your learners from one point to the next, and how to know when they’ve gotten there.
This is a problem with curriculum design as well as preparation. When writing curriculum, it is easy to allow content objectives to distract from learning objectives. One way to prevent this is to take a “reverse” approach to instruction, as advanced in Wiggins and McTighe’s Understanding by Design, that keeps the focus firmly on learning outcomes. The order of preparation in this case becomes
- Determine your learning objectives
- Decide what constitutes evidence that objectives have been met, and design assessments to target that evidence
- Design instruction: Sort assessments in order of increasing complexity, and write content that connects everything together
In the context of preparing for a Carpentries-style workshop, the lesson design has already occurred, and many lessons include pre-written exercises to use for assessment. In this context, reverse instructional design principles might be applied as follows: 1) review the lesson’s learning objectives carefully, thinking about how they will work for your audience, 2) scan the lesson to identify promising points to check in with your learners, using formative assessment to verify that objectives have been met, and then 3) review the connecting content in detail to be sure everything works and you have anticipated likely problems and questions.
Working With Learning Objectives
Once you have an idea of your intended audience, the next step is to think through the goals for your workshop. These goals are usually communicated through learning objectives.
The “learning objectives” section is an easy thing to pass over when you’re preparing to teach. It may seem obvious or unnecessary. However, good learning objectives are quite specific about the intended effect of a lesson on its learners. We aim to create learning objectives that are specific, accurate, and informative for both learners and instructors.
Bloom’s Taxonomy is a framework for thinking about learning that breaks progress down into discrete, hierarchical steps. While many ideas have come and gone in education, Bloom’s has remained a useful tool for educators, in particular because the hierarchy seems to be reasonably valid: outcomes at the top of the hierarchy cannot be achieved without mastery of outcomes at the bottom. In the long term, everybody wants to be at the top. However, in aiming to meet learners where they are, we also need to be mindful about helping them to “grow a level,” helping them to recognize when they have achieved that growth, and guiding them to look ahead to where we might not be able to take them.

Image credit: Vanderbilt University Center for Teaching
Evaluate Learning Objectives
Your instructor has posted links to a handful of current Carpentries lessons in the Etherpad. Select one learning objective from one of those lessons, then complete the following steps to evaluate it.
- Identify the learning objective verb. How specifically does this verb describe the desired learner outcome?
- Where does this verb fit on Bloom’s taxonomy? Do you think this is an appropriate level for your learners?
- In your opinion, does the lesson do an effective job of meeting the stated objective?
- What would the next level on Bloom’s taxonomy look like for your learners? How might you be able to help them think ahead to the next level without attempting to get them there during your workshop?
This exercise should take about 10 minutes.
Using Formative Assessments
When assessments are created in a reverse-design setting, their primary purpose is to inform the instructor about whether objectives have been met. But, as noted in previous lessons, these assessments are good for everyone! For learners, becoming more aware of their progress is motivating and helps to transfer learned content to long-term memory. Awareness of the learning process, also known as “metacognition,” will also help them to identify appropriate next steps after a workshop has completed.
Where are your checkpoints?
Have a look at your lesson again. Choose a learning objective, and identify where in the lesson that objective should reasonably be achieved. How will you know that that objective has been met for all learners? Will this be clear to them?
Make a plan for where in your lesson you will use different types of formative assessment to help everyone in the room monitor their progress. Keep in mind that formative assessment can take many forms, including multiple choice questions, faded examples, spontaneous questions and calls for sticky notes. Write some notes or thoughts about this process in the Etherpad for discussion.
This exercise and discussion should take about 10 minutes.
You Can’t Just Ask
Self-assessments of skill level are usually inaccurate because of the Dunning-Kruger effect: the less people know about a subject, the less accurate their estimate of their knowledge is. This is one reason why assessments should be specific, as opposed to asking if everyone understands.
Instructor Notes
Many of the Carpentries lessons have instructor’s notes, with information from instructors who have already taught the material. This can be a valuable resource when preparing lessons, especially when teaching a lesson for the first time.
The instructor notes are linked on each lesson page under the “Extras” pull down menu. In addition, configuration problems and other technical hurdles common across multiple lessons are detailed here along with suggested solutions. This link is on the workshop page as well for easy access by learners and during workshops. We’ll see more about workshop pages this afternoon.
Feedback On Your Challenges (Optional)
With these goals in mind, pair up with a partner to discuss the MCQ and faded example problems that you wrote yesterday. Give each other specific, actionable feedback that follows our 2x2 framework. Use that feedback to make at least one modification to your exercise(s). Discuss in the Etherpad the change you made and how it will help you get more useful information about your learners.
This exercise and discussion should take about 15 minutes.
Keypoints:
- To teach effectively, you have to know *who* you are teaching.
- Good learning objectives communicate the intended effect of a lesson on its learners.
- A good exercise provides useful guidance to instructors about next steps needed in teaching.
-------------------------------------------------------
Wrap-Up and Homework for Tomorrow
https://denubis.github.io/instructor-training-8-sessions-DV-BBS-2020/10a-homework/index.html
Questions:
- What have we learned today?
- What needs to be done to prepare for tomorrow?
Objectives:
- Describe overnight homework.
- Produce a paragraph, drawing, or diagram that summarizes what was taught today.
Homework:
Read about centrally-organized and self-organized workshops and our checklists for running workshops. These summarize commonly asked questions about organizing and running workshops. When you arrive tomorrow, we will ask you to add one question about our operations to a list. We will then do our best to answer all of those questions during the day.
Feedback
The Trainer(s) will ask for feedback on the day in some form.
This exercise should take 5 minutes.
Reflecting on the Day
Before we wrap up for the day, take 5 minutes to think over everything we covered today. On a piece of paper, write down something that captures what you want to remember about the day. The Trainers won’t look at this - it’s just for you.
If you don’t know where to start, consider the following list for a starting point:
- draw a concept map, connecting the material
- draw pictures or a comic depicting one of the day’s concepts
- write an outline of the topics we covered
- write a paragraph or “journal” entry about your experience of the training today
- write down one thing that struck you the most
This exercise should take about 10 minutes.
Keypoints:
-------------------------------------------------------
Checkout Process
https://denubis.github.io/instructor-training-8-sessions-DV-BBS-2020/11-checkout/index.html
Questions:
- What do I need to do to finish certifying as a Carpentries instructor?
Objectives:
- Describe the final steps required to qualify as an instructor.
- Schedule your instructor discussion session.
During this period after lunch, we’ll be talking about some of the nuts and bolts of getting involved in the Carpentries. First, we’ll discuss what actions you’ll need to take after this training to become a fully certified instructor. After that, we’ll address any questions about the Carpentries organizations, running workshops, and getting involved in the community in other ways.
Application form
Make sure that you have filled out the Carpentries instructor application form. We can not track your progress and make you an official instructor without it. If you have already filled out this form, you do not need to submit another application.
Instructor Checkout
As you read in your homework last night, there are three final steps to complete before qualifying as an instructor. The instructor checkout webpage explains the procedure in detail. Briefly, the three steps are:
- Make a contribution to a lesson’s content, exercises, or instructor notes by doing one of the following:
- Providing substantive feedback on an existing issue or pull request (preferred).
- Submiting a change (i.e. pull request) to fix an existing issue. (Example good first issues.)
- Proof-reading a lesson and adding a new issue describing something to be improved.
- Take part in a community discussion with experienced instructors.
- Prepare to teach a full Carpentries lesson (i.e. the content of one lesson repository). Then perform a 5-minute live coding demo for that lesson starting at a point chosen by the session lead.
All trainees have 3 months (90 days) from the end date of your training to complete checkout. If you need more time, extensions for up to a year may be requested by emailing checkout@carpentries.org.
Carpentries Tools: Etherpad
The Etherpad is a widely used tools in Carpentries workshops and many other activities in the community. There are etherpads about a many topics, like the two linked in the checkout instructions above. To make them all findable, the Carpentries manage a “pad of pads”. This is a great one to bookmark and use as a reference throughout your checkout process and as a newly minted member of The Carpentries community.
Checking Out Review with Questions and Answers
In small groups, read and discuss one of the three checkout procedures listed above and described in detail at this page. Make notes in the Etherpad and when you’re done, report back to the full group about the requirements for that stage of the process. What questions do you still have about the checkout process?
This exercise should take about 5 minutes.
Schedule a Discussion or Demo
Visit the discussion Etherpad to sign up for a session. If the session you would like to attend is full, contact the discussion host and co-host to ask if you can attend.
If you’d prefer to do your teaching demonstration before your discussion, visit the demo Etherpad and sign up there. This demo rubric is provided as a guide for Trainers evaluating potential new instructors during the teaching demonstration.
This exercise should take 5 minutes.
Lesson Contribution
The lesson materials are hosted on GitHub:
and are developed collaboratively. Each lesson is in a separate repository, and consists of narrative lesson material and an associated directory containing the data or scripts needed in the lesson. This source material is also then served as a website, using GitHub’s “gh-pages” feature.
Lesson contribution is managed within the repository using “issues” and “pull requests”. New problems or suggestions can be introduced as issues, discussed by the community, and addressed via a pull request, which serves as a “request” to make changes, and can also be discussed before changes are merged.
If contributing on GitHub is new for you, see this guide that is customized to the Carpentries workflow.
What’s in a Badge?
Once you have completed all checkout steps, within about 2 weeks you will receive an email with your Instructor badge! What does this mean?
- You get to teach! Badged instructors are certified to co-teach any Carpentries lesson. All Carpentries Instructor badges are acceptable to teach any Software Carpentry, Data Carpentry, or Library Carpentry lesson. While non-badged instructors may also co-teach, every Carpentries branded workshop must have one badged instructor to lead the way.
- You get to vote! Badged instructors are eligible to vote in Carpentries Executive Council elections for their first year, and for all subsequent years in which they continue to participate through teaching or other involvement. See this section from the Carpentries Bylaws for rules governing continuing voting eligibility.
- You’ve got something to brag about! Looking for language to add to showcase your skills and experience? Here is some text to get you started!
Check Out the Discussion (Optional)
As an instructor, your voice is important! We want you to be actively involved in discussions about the lesson materials (and other aspects of the Carpentries community). Go to the GitHub page for the lesson you worked with over the past two days and click on the “Issues” tab. Read through some of the discussions and, if you have anything to add, please add it to the conversation! If you wish to make a pull request, be sure to examine the contribution guidelines for the repository you are working in. If you do make a significant contribution to the discussion, send a link to the issue to checkout@carpentries.org. Congratulations! You’ve just completed one of the three remaining steps in becoming a Carpentries instructor.
Leave about 5-10 minutes for this exercise.
Ongoing support
Discussion sessions aren’t only for instructors-in-training working towards their certification. Instructors are highly encouraged to participate in discussions before and after each of their workshops, so that they can continue to learn from each other and advance their teaching skills. For even more support, consider participating in our Carpentries Mentoring program!
Keypoints:
- To certify, you must contribute to a lesson, take part in a discussion, and do a teaching demo within 90 days of your training event.
-------------------------------------------------------
The Carpentries: How We Operate
https://denubis.github.io/instructor-training-8-sessions-DV-BBS-2020/12-carpentries/index.html
Questions:
- How is The Carpentries organized and run?
- What is the difference between SWC, DC, and LC workshops?
- How do you run a Carpentries workshop?
Objectives:
- Get connected with the Carpentry community.
- Describe where you can go to get information on running a workshop.
In becoming a certified Carpentries instructor, you are also becoming part of a community of like-minded volunteers. This section provides some background on The Carpentries organization, how to participate in one of our primary activities (running workshops), and other ways to get involved with the community.
A Brief History
Software Carpentry was founded in 1998 with the mission of teaching lab skills for research computing. Data Carpentry was founded in 2014 with the mission of building communities teaching universal data literacy.
Also in 2014, Library Carpentry was founded with the mission of teaching data skills to people working in library- and information-related roles.
On January 1, 2018, Software Carpentry and Data Carpentry merged their projects to form a new project called The Carpentries under the fiscal sponsorship of Community Initiatives. Within this new organization structure, Software Carpentry and Data Carpentry retain their individual identities as Lesson Programs of the Carpentries. On November 1, 2018, The Carpentries Executive Council approved Library Carpentry as the third official Lesson Program of the Carpentries.
The Carpentries project comprises communities of Instructors, Trainers, Maintainers, helpers, and supporters from Software Carpentry, Data Carpentry and Library Carpentry who share a mission to teach foundational computational and data science skills.
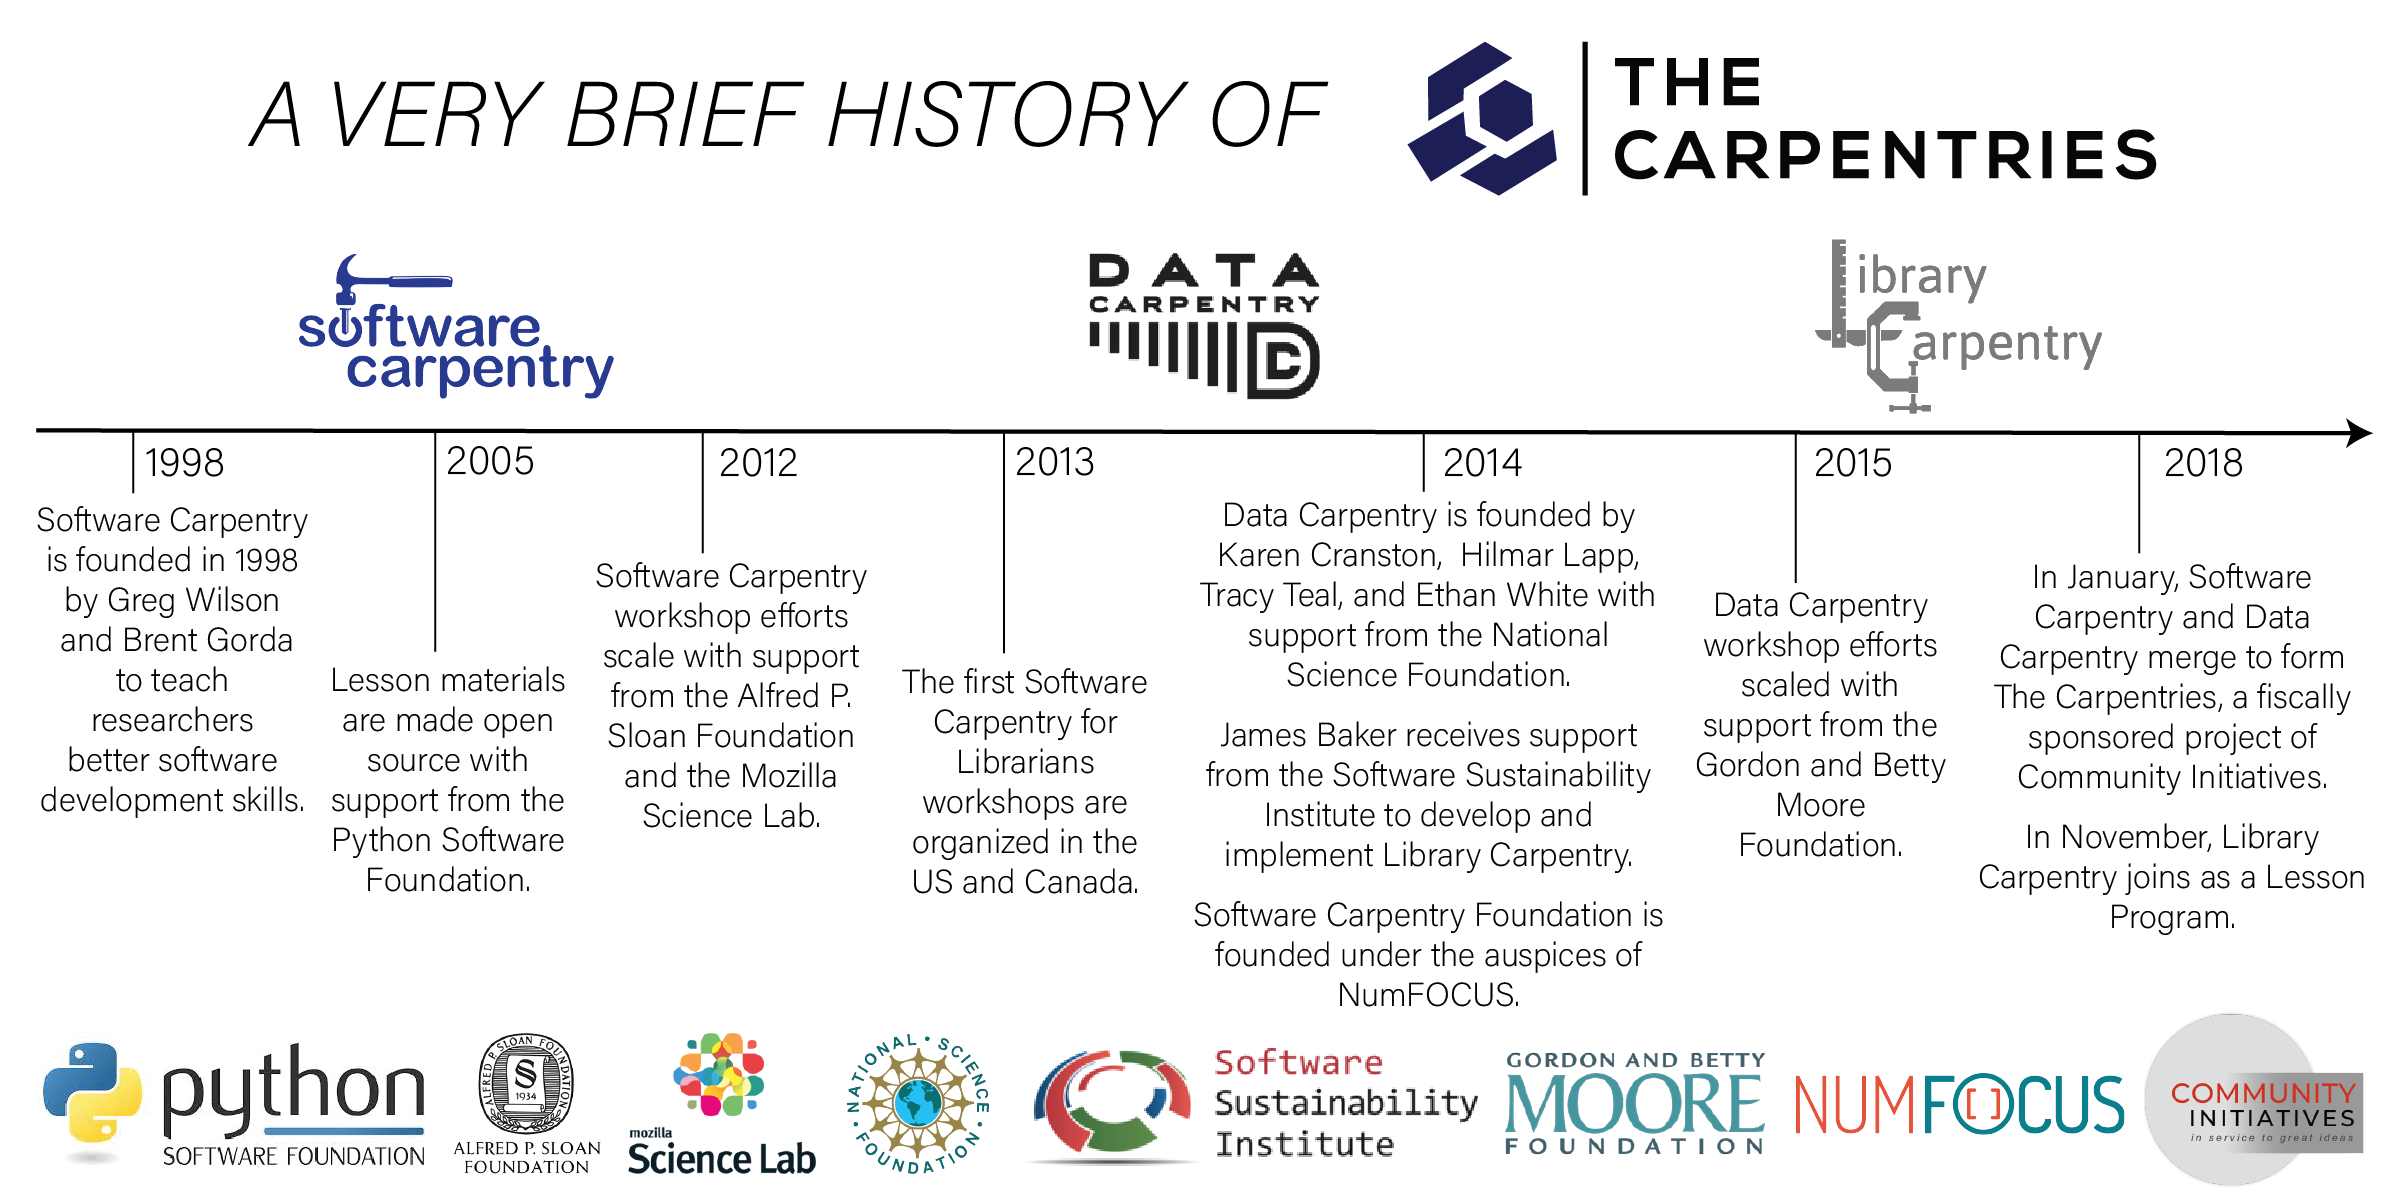
You can learn more about the history and goals of each Lesson Program by reading “Software Carpentry: Lessons Learned”, “Data Carpentry: Workshops to Increase Data Literacy for Researchers” and “Library Carpentry: software skills training for library professionals””.
Similarities and Differences between The Carpentries Lesson Programs
All lesson programs under The Carpentries share the same value of promoting efficient, shareable, and reproducible research practices. Their aligned missions are accomplished by running accessible, inclusive training workshops; teaching openly available, high-quality, community-developed lessons; and fostering an active, inclusive, diverse instructor community that promotes and models reproducible research as a community norm.
Similarities between Software, Data and Library Carpentry workshops include:
- a focus on technical skills.
- a two-day format taught by volunteer instructors.
- a focus on filling gaps in current training for learners.
The major differences between Software, Data and Library Carpentry workshops are their content and intended audience.
Software Carpentry workshops are:
- intended for people who need to program more effectively to solve their computational challenges,
- not domain-specific, and
- modular—each Software Carpentry lesson is standalone.
Data Carpentry workshops:
- are aimed at pure novices,
- are domain-specific,
- focus on best practices surrounding data, and
- present a full curriculum centered around a single data set.
Library Carpentry workshops:
- are aimed at people in library- and information-related roles,
- focus on best practices in data structure, and
- are modular—each Library Carpentry lesson is standalone.
- are sometimes less than two days.
In a visual representation, these similarities and differences look like this:

What is a Carpentries Workshop? The Rules.
Using the Names and Logos
The names “Software Carpentry”, “Data Carpentry” and “Library Carpentry” and their respective logos are all trademarked. You may only call a workshop a Software Carpentry, Data Carpentry, or Library Carpentry workshop if:
- it covers the core topics (see below),
- at least one of the instructors is a certified Carpentries Instructor,
- you run our standardized pre- and post-workshop assessments and ensure everyone participates.
Materials
Note that the individual Software Carpentry, Data Carpentry, and Library Carpentry lessons materials are freely available under a permissive open license. This means that you may use them in contexts outside a Carpentries workshop (e.g. as material introduced into a longer course, as a standalone 2-3 hour session, as homework exercises, etc.) provided you cite the original source.
It is only when you want to run a branded “Carpentries” workshop using the materials that the requirements listed above are needed.
What is the Core Curriculum?
A Software Carpentry workshop must include lessons on version control (e.g. Git), the UNIX shell, and a programming language (e.g. R or Python).
A Data Carpentry workshop must include a Data Carpentry lesson on data organization and three other modules in the same domain from the Data Carpentry curriculum. Published curricula include the Ecology, Genomics, Social Science and Geospatial workshop materials. Additionally, Astronomy, Digital humanities, Economics and Image analysis curriculum are under development.
A Library Carpentry workshop must include three to four of the core lessons, which include an introduction to data, the UNIX shell, OpenRefine, and Git. Library Carpentry also maintains an “extended” set of lessons that can be taught in addition to the core curriculum These lessons are taught infrequently or are under development and include: SQL, webscraping, Python and an introduction to data for archivists.
Within these guidelines, there is flexibility in which episodes of the lesson you cover, which exercises you use, and whether you include optional materials (e.g. callouts) and optional episodes.
Who Can Teach What
People who have gone through the two-day instructor training course and completed the the checkout process are considered “certified” Carpentries instructors and can teach curricula for any of the lesson programs (Software Carpentry, Data Carpentry, or Library Carpentry) as they feel able. While instructor badges may list a primary lesson program affiliation, instructors are not required to certify separately for each. For more information, see the description of the instructor checkout procedure.
Note that as long as you have at least one certified instructor, the other instructors and helpers at a branded workshop do not have to be certified. We rely on the judgment of local organizers to recruit and orient volunteers who will embody the Carpentries ethos and practices.
Local Support
There is a great list here in the handbook Helper Checklist and Suggestions.
How to Run a Carpentries Workshop
The Carpentries Handbook is a community-developed resource that provides tips, checklists, and points of contact for nearly all Carpentries-related activities in one location. The Carpentries Handbook is the definitive source for policies and information. Here, we will cover some information about actually running a workshop.
Briefly, there are two types of Carpentry workshops: centrally-organized and self-organized. Centrally-organized workshops are organized by a team of Regional Coordinators who take care of logistics and administration such as finding instructors and handling workshop registration. For self-organized workshops, the organization hosting the event is responsible for these details.
Workshops as an Instructor
As an instructor, you may be primarily teaching at local workshops or you may not have local opportunities, or you may just want to teach somewhere else.
If you want to teach non-locally, you should be sure to join our instructor mailing list during the community exercise below, so that you hear about upcoming teaching opportunities.
Note that the Carpentries does not guarantee that instructors will get to teach at workshops after they are trained, so the best way to make sure that you get to teach (if you want) is to try running a workshop or even a single lesson yourself. It can seem daunting to organize your own workshop, but as long as you have 1-2 people who can either help or co-instruct, the Carpentries staff and community can provide support and guidance so that it’s not so scary!
In both cases (self- or centrally-organized), you can start the workshop process by completing the Carpentries workshop request form.
For more details on how to run each type of workshop, see:
or the the following Lesson Program specific references:
- Data Carpentry
- Library Carpentry
- Software Carpentry workshop pages.
Policies related to instructor training and workshops The Carpentries can be found in The Carpentries Handbook. Please be sure to read through the instructor no-show policy before signing up for your first workshop.
Setting Up
In order to communicate with learners, and to help us keep track of who’s taught what and where, instructors create a website with information about their workshop.
To ensure unique names for each event,
we use the year-month-day-venue format for the identifier, the slug.
For instance, for a workshop that starts on Febuary 22nd, 2022
at the University of Data Skills,
the slug would be 2022-02-22-data-skills.
If you are teaching a centrally-organized workshop,
please wait for the email from your regional coordinator
that will tell you the slug to use for your workshop.
Once that your workshop website has been created, the host or lead instructor sends its URL to the workshop coordinator, who adds it to our records. The workshop will show up on our websites shortly thereafter.
You may also create an etherpad for your workshop
(or other Carpentries-related event).
When you point a browser to a url at
https://pad.carpentries.org/workshop-slug
(e.g., https://pad.carpentries.org/2022-02-22-data-skills
for the example above)
you will either arrive at an existing etherpad by that name or a brand new
etherpad with basic Carpentries information at the top.
Practice With The Carpentries Infrastructure
Go to the workshop template repository and follow the directions to create a workshop website using your local location and today’s date. Put the link for your workshop website into the Etherpad.
This exercise should take about 25 minutes.
Note: Sometimes web browsers will cache the workshop webpage, so when you make changes in GitHub, they don’t show up on the workshop webpage immediately. Two ways to avoid this are to use a “private” or “incognito” mode in your web browser or by following these instructions to bypass your browser cache.
Question and Answer
What questions do you have about running and teaching at a workshop? Talk with a partner and enter your questions into the Etherpad. At this time we will also return to discuss questions remaining from the beginning of the day.
Leave about 10 minutes for this discussion.
A Culture of Contribution
In the same way that we hope to promote a culture of openness, sharing, and reproducibility in science and research through training researchers with the tools they need, the Carpentry organizations themselves aim to be open, collaborative, and based on best practices. We want to draw together the collective expertise of our teaching community to create collaborative lessons, share other materials, and improve the lessons via “bug fixes” as we go along.
Lesson Incubation
Maybe this instructor training has inspired you to go home and write your own fantastic lesson! If you’d like to model it after the Software, Data and Library Carpentry lesson format, you can find a template and instructions in the Carpentries lesson example repository.
Many Ways to Contribute
We recognize that the medium of GitHub may be restrictive to those who wish to contribute to our lessons. We are always searching for ways to make the process more friendly to all, whether that be contribution training, or alternative routes to contribution. If you have any ideas how we might make contribution more contributor-friendly, please let us know.
Being part of a friendly, open discussion, is of equal or greater importance to the community than submitting the perfect lesson change. The checkout process to become a certified instructor will be one way to start connecting to the community and find which area will allow you to contribute best.
The Carpentries Community
As you can imagine, based on the above, there are many aspects of running the Carpentries! While there are a small number of dedicated staff who work for the Carpentries organization, the real power of the Carpentries is in its community of volunteers that take on all sorts of roles to teach and organize workshops, help produce and maintain lessons, and most importantly, build local and global communities of practice around skills for data analysis, computational thinking, and research software development. Our community depends on individuals like you who are passionate about expanding these communities of practice through inclusive and evidence-based instructional practices, and can contribute your perspective and expertise to continually refine our instructional materials and practices. A full description of the breadth and diversity of community member roles, an overview of the Carpentries’ various social media channels, a calendar of future community events, and descriptions of mailing lists used by the community can be found here on the Carpentries website and also on the getting connected page.
Participating in the Carpentries – What’s Your Role?
If you are at an in-person training, your instructor will hand out paper copies of a worksheet. If you are at an online training, you can get a digital copy here.
Take a moment to review member community roles on the Carpentries’ community website. Working on your own, match up the roles with the descriptions. When you are done, think about the question at the bottom of the worksheet about what roles you might play, and enter your thoughts in the Etherpad.
Solution
Instructors: C Mentors: E Trainers: D Lesson developers: J Curriculum advisors: B Lesson maintainers: F Lesson Infrastructure Team: I Assessment Team: K Champions: L Infrastructure Team: H Regional Coordinator: A Code of Conduct Committee: G
This exercise should take about 10 minutes.
Get Connected
Take a couple of minutes to sign up for the Carpentry discussion channels you want to stay involved with.
Keypoints:
- Carpentry materials are all openly licensed, but Software and Data Carpentry names and logos are trademarked.
- Carpentry workshops must cover core concepts, have at least one certified instructor, and use our pre- and post-workshop surveys.
- [Guidance for teaching and hosting workshops](https://docs.carpentries.org/topic_folders/hosts_instructors/index.html) is provided in [The Carpentries Handbook](https://docs.carpentries.org).
-------------------------------------------------------
Managing a Diverse Classroom
https://denubis.github.io/instructor-training-8-sessions-DV-BBS-2020/13-management/index.html
Questions:
- How can I prepare for effective co-teaching?
- What are the challenges of managing a heterogeneous classroom?
- What do I do if there is a Code of Conduct violation?
Objectives:
- Evaluate different strategies for managing a class in which learners have diverse backgrounds and skill levels.
- Know what to do if someone at your workshop violates the Code of Conduct.
We now have several tools that can be used for teaching Carpentries workshops and improving our skills: live coding; observation and feedback; and how to prepare to teach a lesson. This last section includes tips and recommendations for interacting with real people in real-life settings – which for the Carpentries, often means an audience with diverse backgrounds and experiences.
Managing a Diverse Classroom
Although our workshops are targeted at novices, every workshop will have participants from a variety of backgrounds and technical skill levels. Some may be at the novice level in one technology (e.g. git), but competent or even expert in another (e.g. R). As an instructor, you will need to be attentive to this diversity in your learners’ prior skill level, and adjust your instruction appropriately. This is one of the most difficult things instructors experience when running a workshop.
What Are the Challenges?
What are some of the challenges you might expect when teaching learners with a broad range of expertise? Discuss with a partner and put your thoughts in the Etherpad.
This discussion should take about 10 minutes.
Here are some strategies Carpentries instructors have generated to deal with this issue:
- Before running a workshop,
communicate its level clearly to everyone who’s thinking of signing up
by describing not only the topics that will be covered (e.g. plotting in R), but
also the concrete skills that learners will have after the workshop (i.e. the learning objectives).
If you’re upfront with participants that you’ll be spending time learning how
forloops work, more advanced learners are less likely to sign up. - When asking learners to complete exercises, give “beginner” and “advanced” options. Learners who finish the “beginner” exercise can then challenge themselves and don’t get bored.
- Ask more advanced learners to help people next to them. They’ll learn from answering their peers’ questions (since it will force them to think about things in new ways).
- Take care not to let enthusiastic advanced learners carry the conversation, as this tends to alienate novices and consumes valuable class time. Advanced questions and discussion can be politely reserved for breaks or dealt with by helpers or the co-instructor in the Etherpad.
- The helpers and the instructor who isn’t teaching the particular episode should keep an eye out for learners who are falling behind and intervene early so that they don’t become frustrated and give up.
The most important thing is to accept that no class can possibly meet everyone’s individual needs. If the instructor slows down to accommodate two people who are struggling, the other 38 are not being well served. Equally, if she spends a few minutes talking about an advanced topic because two learners are bored, the 38 who don’t understand it will feel left out. All we can do is tell our learners what we’re doing and why, and hope that they’ll understand.
Learners Use Their Own Machines
Learners tell us that it is important to them to leave the workshop with their own machine set up to do real work. We therefore continue to teach on all three major platforms (Linux, Mac OS X, and Windows), even though it would be simpler to require learners to use just one.
We have experimented with virtual machines (VMs) on learners’ computers to reduce installation problems, but those introduce problems of their own: older or smaller machines simply aren’t fast enough, and learners often struggle to switch back and forth between two different sets of keyboard shortcuts for things like copying and pasting.
Some instructors use Virtual Private Servers (VPS) over Secure Shell (SSH) or web browser pages instead. This solves the installation issues, but makes us dependent on host institutions’ WiFi (which can be of highly variable quality), and has the issues mentioned above with things like keyboard shortcuts.
Code of Conduct Violations
As discussed in the Motivation episode, the Carpentries uses a Code of Conduct as a tool to create a respectful and inclusive learning environment. Occasionally, part of managing the classroom may include dealing with a Code of Conduct violation.
If you are an instructor, and believe that someone in a workshop has violated the Code of Conduct, you may warn them and/or ask them to leave the workshop, depending on the severity of the incident and your comfort level.
If you are attending a Carpentries workshop, in-person event, or participating in one of our online events or communication channels and believe someone is in physical danger, please ask your workshop host, instructor(s), or another community member to contact the appropriate emergency responders (police, crisis hotline, etc.). Prior to a Carpentries workshop or in-person event, event organisers should determine emergency contact numbers and local procedures.
If you believe someone violated the Code of Conduct during a Carpentries event or in a Carpentries online space, we ask that you report it. If you are not sure if the incident happened in a Carpentries governed space, we ask that you still report the incident. You are encouraged to submit your report by completing the Code of Conduct Incident Report Form or e-mailing C. MacDonnell at confidential@carpentries.org as soon as you can to let us know what happened so that we can follow-up with the workshop host and/or participants as needed. The form may be completed anonymously, or you may include your contact information.
The local workshop host is expected to help enforce the Code of Conduct and you can ask them to mediate an incident if you are uncomfortable or unable to do so yourself. If you choose to settle the issue yourself, you should notify the workshop host of the issue in case s/he feels additional steps should be taken.
You also have the right as an instructor to walk out of a workshop if you feel that the participants or hosts are not supporting your attempts to enforce the Code of Conduct. Again, please contact us as soon as possible if this happens.
Never Teach Alone: How to Be a Co-instructor
The best thing about managing a classroom for a Carpentries workshop is that you never face problems alone! Your co-instructor, helpers, and host are all there for you. Co-teaching describes any situation in which two teachers work together in the same classroom. Friend and Cook’s Interactions describes several ways to do this; we use the following methods most frequently:
-
Team teaching: Both teachers deliver a single stream of content in tandem, taking turns the way that musicians taking solos would.
-
Teach and assist: Teacher A teaches while Teacher B moves around the classroom to help learners.
Both of these models are better than teaching alone because they create opportunities for lateral knowledge transfer. Team teaching is particularly beneficial in day-long workshops: not only does it give each teacher’s voice a chance to rest, it reduces the risk that they will be so tired by the end of the day that they will start snapping at their learners or fumbling at their keyboard. Having a co-instructor also means that you can teach a workshop without knowing all the topics that are being taught, and if multiple instructors are both knowledgeable on the same topics, they can help each other answer questions.
Putting some thought into how you and your co-instructor will work together can make the most out of this supporting relationship and can make the difference between a good workshop and a great one – for you and for your learners.
How to Help
Many people are willing and able to provide in-class support. We call these people “helpers.”
Helpers can assist in a variety of ways: help learners with setup and installation, answer questions during exercises, monitor the room to spot people who may need help, or keep an eye on the shared notes and either answer questions there or remind the instructor to do so during breaks. The helper checklist describes what helpers can do to help instructors in more detail.
Helpers are sometimes people training to become teachers (i.e., they’re Teacher B in the teach and assist model), but they can also be advanced learners who already know the material well, previous workshop participants, or members of the host institution’s technical support staff. Using advanced learners as helpers is doubly effective: not only are they more likely to understand the problems their peers are having, it also stops them from getting bored.
Teaching Together - Nuts and Bolts
With a partner, imagine that you are planning a workshop together and answer the following questions:
- How would you prepare to teach a workshop together?
- During the workshop, what are some things the assisting instructor can do (or shouldn’t do!) to support the main instructor?
As an entire group, discuss what you came up with and then compare to the recommendations below.
Recommendations
If you and a partner are co-teaching, try to follow these recommendations:
Coordinate who is teaching what, sufficiently in advance that both instructors are confident in their preparation.
If you have time to do some advance preparation together, try drawing a concept map together or teaching a short snippet of the lessons for each other.
Discuss in advance if you will providing feedback to each other and how to do so (see notes above).
If it won’t cause cognitive overload for you (the instructors), work out a couple of hand signals to communicate. “You’re going too fast”, “speak up”, “that learner needs help”, and, “It’s time for a bathroom break” are all useful.
The person who isn’t teaching shouldn’t interrupt, offer corrections, elaborations, or amusing personal anecdotes, or do anything else to distract from what the person teaching at the time is doing or saying. The one exception is that it’s sometimes helpful to ask leading questions, particularly if the learners seem unsure of themselves.
For Carpentries workshops, a single instructor usually teaches for a half-day stretch (2-3 hours). You can alternate more frequently, but each person should teach for at least 10-15 minutes at a stretch, since learners may be distracted by more frequent interleaving.
Each person should take a couple of minutes before they start teaching to see what their partner is going to teach after they’re done. This allows each instructor to set up their partner’s material without covering it themselves.
Whenever possible, the person who isn’t teaching should stay engaged with the class. Monitor the shared notes, keep an eye on the learners to see who’s struggling, jot down some feedback to give your teaching partner at the next break - anything that contributes to the lesson is better than anything that doesn’t. It’s easier for the other instructor to take a break to catch up on outside work (like email) if there are at least three instructors or sufficient helpers to make sure that the main instructor is supported.
In teaching as in life, shared misery is lessened and shared joy increased; take a few minutes when the class is over to either congratulate or commiserate with each other. In that moment, no-one will better understand how pleased you are at helping someone understand how loops work, or how disappointed you are that you just couldn’t get software to install on that one learner’s laptop, than the person you just taught with.
At the end of the morning, do the following:
Minute Cards Revisited
Use your sticky notes to write minute cards as discussed yesterday.
Keypoints:
- Working with a broad range of learners can be challenging, but there are many ways to keep a classroom happy and motivated.
- Response to a Code-of-Conduct violation at a workshop is subject to instructor discretion, but all violations should be reported to the Carpentries for follow-up.
-------------------------------------------------------
Wrap-Up and Homework for Tomorrow
https://denubis.github.io/instructor-training-8-sessions-DV-BBS-2020/13a-homework/index.html
Questions:
- What have we learned today?
- What needs to be done to prepare for tomorrow?
Objectives:
- Describe overnight homework.
- Produce a paragraph, drawing, or diagram that summarizes what was taught today.
Homework:
Weekend Homework for day 7: Group task: Poke at issues, poke at making a sample git page, Personal task: print and highlight your live-coding episode.
Feedback
The Trainer(s) will ask for feedback on the day in some form.
This exercise should take 5 minutes.
Reflecting on the Day
Before we wrap up for the day, take 5 minutes to think over everything we covered today. On a piece of paper, write down something that captures what you want to remember about the day. The Trainers won’t look at this - it’s just for you.
If you don’t know where to start, consider the following list for a starting point:
- draw a concept map, connecting the material
- draw pictures or a comic depicting one of the day’s concepts
- write an outline of the topics we covered
- write a paragraph or “journal” entry about your experience of the training today
- write down one thing that struck you the most
This exercise should take about 10 minutes.
Keypoints:
-------------------------------------------------------
More Practice Live Coding
https://denubis.github.io/instructor-training-8-sessions-DV-BBS-2020/14-performance/index.html
Questions:
- How did you change your teaching in response to feedback?
Objectives:
- Use feedback to improve your teaching.
Continuing our theme of developing practical Carpentries teaching skills, this section provides another chance to practice live coding, to go through the process of observing and giving feedback, and to make changes to how we teach based on the feedback of others.
Round Two
First, have a look at the rubric that is given to trainers as a suggested framework for evaluating the online teaching demonstration sessions that are part of instructor checkout. Does this rubric make sense? Take a moment to think about things you’d like to do differently with your next live coding practice. This is also a good time to ask questions about teaching demonstration.
Next, get back into the same groups you did your live coding with. Take turns re-teaching your chosen live coding session, making sure to incorporate changes based on the feedback you received and any new ideas based on reading the rubric. This time, give feedback to each other using the checkout rubric you just discussed. When you are finished, add some thoughts on this process to the Etherpad: What did you change? Did it work better or worse with the change? How might you do it if you were to teach it again?
This exercise should take about 25 minutes for teaching, plus 20 minutes for pre and post discussion.
Keypoints:
- (Reflective) Practice makes perfect.
-------------------------------------------------------
Workshop Introductions
https://denubis.github.io/instructor-training-8-sessions-DV-BBS-2020/15-introductions/index.html
Questions:
- How do you actually start a workshop?
Objectives:
- Create an outline of important topics to cover in an introduction.
- Describe three ways to start workshop participants talking to each other.
- Receive one piece of feedback on your own introduction
One of the most important things that you can do as an instructor is to set the workshop environment from the beginning. One way to do this is by having a well-planned introduction. This episode discusses the value of setting the environment from the beginning and some of the components that go into an effective introduction, and includes time to practice giving part of a workshop introduction.
Setting the Workshop Environment
Your Academic Past
Think back to courses or workshops you really liked or didn’t like.
- How did those courses start?
- Were you confident in the instructors abilities?
- Did you feel like they were enthusiastic about the course and invested in you?
- Was it clear what you were going to be learning?
- Were you excited about the material?
- Did you leave that first day thinking the instructor was uninterested, that you weren’t the learners they wanted to be teaching or you had no idea what the course was supposed to be about?
Your impression on the first day of a course probably matched that of the rest of the course. Introductions set the tone for the workshop and the path for learning.
Introductions are particularly important when we have just two days. Also, in Carpentry workshops we’re teaching not only a set of skills, but also trying to give learners the confidence to become self-directed learners. Learners should leave feeling excited and empowered. It’s up to you as an instructor to empower your learners, so it’s important to set a positive and welcoming environment for the workshop.
Having a planned introduction, also helps you be less nervous. Having a planned introduction helps get you started. Even in the face of early technical issues (which is common at the start of a workshop), you can have a chance to reset with something you’re comfortable and ready for.
What’s in an Introduction?
Get into small groups (3-4 people) and discuss these questions for 10 minutes. Take notes on your answers – we’ll combine them later.
- What do you hope to accomplish in a workshop introduction?
- What information do you need to include in an introduction to accomplish these goals?
After 5 minutes, come together, and combine ideas as a large group.
Finally, compare your ideas with the list of topics below. Did you miss anything? Did you come up with something that’s not listed below?
Optional question: what did you (the leader) do or not do in your introduction to the session?
Goals For the Introduction
After the introduction learners should:
- believe in your competence to teach the workshop
- be able to predict the type of instruction
- know what will be taught
- know what will be required of them
The instructor should:
- have an understanding of who is taking the workshop and what their expectations are
Components of the Introduction
To meet these objectives an introduction should:
- Set positive first impressions
- Introduce yourself effectively (and have other workshop leaders do the same)
- Clarify learning objectives and expectations
- Help learners learn about each other
- Set the tone for the workshop
- Collect baseline data on learners’ knowledge and motivation
- Whet learners’ appetite for workshop content
- Inform Learners of Logistics
1. Set Positive First Impressions
First impressions can be long-lasting. Before you even start teaching, your learners will have already made some decisions about you, so it is important to understand what those impressions are based on and how to manage them.
Your attire. Research shows that clothing affects the judgments people make, including credibility, likability, dominance, kindness, and empathy (Raiscot, 1986; Morris et al., 1996). More formal attire communicates expertise and confidence. Less formal attire communicates approachability. Usually, it is easier to relax from a more formal impression into a more relaxed one than the other way around. These considerations are likely to be particularly relevant for young instructors who are concerned about establishing themselves as authoritative.
The physical environment. Learners can make decisions about what kind of course yours will be by the way the chairs are arranged. Rows signify a more formal environment, while circles or U-shapes imply a more informal atmosphere, with higher expectations of learner participation.
Your use of the few minutes before class. Greeting the learners as they enter the classroom communicates approachability. Frantically arriving right on time or late communicates disorganization.
2. Introduce Yourself Effectively
Your introduction should be succinct, but make sure to cover certain key areas. These questions should help you decide what to say:
What characteristics do you want to convey about yourself? You probably want the learners to get a sense of your qualifications, how formal/informal you want to be, and how available you will be to the learners. You want to demonstrate that you’re qualified, but that you share the same challenges as the learners, so you remain accessible.
What will you need to say to convey those characteristics? Consider talking about your research and computational interests as they relate to the workshop, in order to establish yourself as an authority, and to make the workshop more relevant.
Why are you teaching a Carpentries workshop? Why are you an instructor? What’s motivating you to be there today? One reason might be that you took a workshop and saw how valuable these skills were in your own work and wanted to share this information with others. Convey your enthusiasm for being there.
What should you be careful not to say? Learners do not need to know everything about you. In particular, it is not helpful to say you’ve never taught the course before, or that it is your least favorite course to teach, or to disclose any irrelevant personal information that can undermine you in the eyes of your learners.
Introductions for Everyone
If you’re teaching a typical Carpentries workshop, then you’re probably not teaching alone! After introducing yourself, make sure that you give everyone involved in the workshop - instructors, helpers, organizers - a chance to introduce themselves as well.
If you’re the workshop organizer, this can also be a good time to thank volunteers who are instructing or helping.
3. Clarify Learning Objectives and Your Expectations
This is probably the most important step. Clearly laying out expectations orients learners towards what you expect from them, and helps them use their time productively.
Describe the prerequisites so learners will know what information you are assuming they already know. For Data Carpentry no prior computational experience is required. Expectations vary for Software Carpentry and Library Carpentry workshops. Convey what your expectations are.
Highlight main aspects of the schedule.
Communicate the workshop structure so the learners will understand the decisions that have been made in designing the workshop. Make sure to highlight the learning objectives and the hands-on instructional strategies we use and the workshop policies.
Clarify workshop roles. Explain who is doing what at the workshop and what learners can expect from the workshop leaders. If you haven’t already introduced helpers or other workshop leaders, make sure to do so.
Explain your expectations for learner behavior including expectations around:
- Code of Conduct
- ways to ask for help
- ways to give instructors feedback
Communicate your commitment to the learners’ learning experience.
Share some advice for success in your course. Let learners know you are confident in their success as long as they put in the required effort.
4. Help Learners Learn About Each Other
The classroom is a social environment, so it is helpful to start the social dynamics in a productive way.
Icebreakers raise the energy levels and get learners comfortable so that they will be ready to work in groups or dialogue with each other.
Example Icebreaker
Here is one example of an icebreaker you can use: Have everyone turn to a partner and introduce themselves with their name, one word about their research (e.g.’microbes’, ‘dogs’, ‘vectors’, ‘stars’) and a thing they’re proud of that they made.
Head here for more examples of Icebreakers.
5. Set the Tone for the Workshop
The way you engage learners at the beginning sends powerful messages about the level of involvement and interaction you expect from them.
Since these workshops are hands-on don’t spend a lot of the time at the beginning lecturing. Get to introductions and interactions right away. You don’t want learners to think they just have to listen in the course.
Also establish a culture of feedback. Let learners know you are interested in how they experience the course and in any suggestions they have. Let them know they should feel free to give you constructive feedback, even anonymously. They can do this in particular with minute cards. You might not adopt every suggestion they have but you will listen and consider them. This starts to create a partnership in learning.
6. Collect Baseline Data on Learners’ Knowledge and Motivation
You will already have information on their skill level from the pre-assessment survey. Before starting your workshop, decide what to do about different/inadequate prior knowledge. If this is a workshop where a certain knowledge is required (such as an advertised advanced workshop), decide in advance how you will handle a range of skill sets. You might tell them they cannot take the workshop, or that they must work through certain sections on their own.
7. Whet Learners’ Appetites for Workshop Content
They’re already at the workshop, so it might seem unnecessary to motivate them to be there, but it is a great chance to stimulate interest about the workshop and to activate relevant prior knowledge learners have about the material.
8. Inform Learners of Logistics
Let them know about any logistics for the days - lunch times, breaks, accessibility, etc.
Practice Your Introduction
Imagine you have completed instructor training and you are about to teach a full lesson around the material you have been practicing teaching today.
- Write out some notes, covering some of the topics described above:
- Introduce yourself effectively
- Clarify learning objectives and expectations
- Set the tone for the workshop
- Return to your groups of 2 or 3 and each give 2 minutes of your introduction. (5-6 min)
- After each introduction, provide 2-3 minutes of feedback.
This exercise will take 15-25 minutes depending on whether time is included for feedback or not.
These materials are adapted from Carnegie Mellon Eberly Center Teaching Excellence & Educational Innovation
Keypoints:
- A planned introduction is a helpful tool in setting the workshop environment.
- Introductions should both include practical information and start building relationships.
-------------------------------------------------------
Putting It Together
https://denubis.github.io/instructor-training-8-sessions-DV-BBS-2020/16-practices/index.html
Questions:
- How are the teaching practices we've learned used in our workshops?
Objectives:
- Organize your knowledge of teaching practices and create a plan for using these practices in a Carpentries workshop.
We’re almost done with our training! At this point, we’ve covered many, many topics around teaching and learning, especially in the context of Carpentries workshops.
Carpentries instructors use a set of teaching techniques based on evidence from educational research. We’ve talked about some of these techniques explicitly (e.g. participatory live coding and formative assessment), and others we’ve been modeling throughout the workshop, without necessarily calling attention to what we were doing. Some of these teaching techniques are implemented at particular points in a workshop, while others are used throughout. Let’s put together everything we’ve learned and organize these practices in terms of what parts of a workshop we need to be conscious of each of these strategies. In other words, let’s put down on paper some of our mental model about teaching and learning, specifically in the Carpentries context.
Picking up the Pieces (optional)
In small groups or on your own, make a list of all the concepts and skills you’ve encountered in this training. Your list can include everything from educational/teaching theories to specific in-classroom practices.
Solution
Compare your list of topics with the list below. What’s missing, either in your list or the one below?
Here is a non-exhaustive list of topics:
- novice, competent practitioner, expert
- mental model
- formative assessment
- expert awareness gap
- short-term and long-term memory
- cognitive load
- motivation
- demotivation
- error-framing
- life-long learning
- feedback
- lesson study
- Code of Conduct
- concept maps
- Multiple Choice Question (MCQ)
- peer instruction
- going slowly
- “just”
- accessibility
- sticky notes
- one-up, one-down
- pre- and post-workshop surveys
- participatory live coding
- introductions
Organize Your Knowledge
Let’s put the pieces together by creating a visual organization of information.
We suggest doing this in two ways:
- If you are comfortable with / like concept maps, trying integrating all the topics above into a single concept map.
- Use the provided handout to organize topics. Here are two examples:
- Handout One (with example content: example)
- Handout Two
Work on this on your own. There’s no “right answer” – this is about you building up a mental model, moving from “novice” to “competent practitioner”.
Once you’ve organized your thoughts, move to the next exercise.
Parting Thoughts
If you didn’t think about these issues when organizing your topics in the previous exercise, now consider:
- What is your mental model of teaching?
- Can you identify why each topic above applies to teaching for the Carpentries?
While there are many ways to think about the practice of teaching, we hope that this training has provided a model of teaching that is learner-centered. In other words, teaching is not really about the teacher, but the learners! The more we know about learner’s backgrounds, motivations, and how they learn (educational psychology) and what interventions can address these issues, the more effective our teaching can be. This also means that our model of teaching doesn’t mean you need to be an expert in the content you’re teaching or that you have to have a certain kind of personality – ANYONE can learn, practice and improve their teaching, as with any skill.
Keypoints:
- Having a plan makes it easier for you to remember to implement the important teaching practices you've learned.
-------------------------------------------------------
Wrapping Up
https://denubis.github.io/instructor-training-8-sessions-DV-BBS-2020/17-wrap-up/index.html
Questions:
- What can we improve in this training?
Objectives:
- Reflect on the two-day course.
- Articulate constructive feedback.
One Up, One Down
Provide one up, one down feedback on the entire two-day course.
Just as in our regular workshops, we collect post-instructor-training-workshop feedback. Your participation will help us evaluate the efficacy of this training and improve the content and delivery of the lesson materials.
This exercise should take 5 minutes.
Minute Cards
In addition to giving one up, one down feedback. Please also fill out your sticky notes to give your instructors anonymous feedback.
This exercise should take 5 minutes.
Post Workshop Surveys
Assessment is very important to us! Please take 5 minutes to complete this five-minute post-workshop survey.
This exercise should take 5 minutes.
Thank You
Thank you for taking part in this instructor training workshop. We hope it was a valuable and enjoyable experience, and we look forward to having you as Carpentries instructors!
Keypoints:
- Feedback applies to all kinds of learning, including learning how to teach.
-------------------------------------------------------
BEFORE YOU LEAVE
Please fill out the post-training survey at https://www.surveymonkey.com/r/instructor_training_post_survey?workshop_id=INSTRUCTOR_PASTE_WORKSHOP_ID_HERE
Lesson content on this page released under a creative commons attribution license. Lesson Content © 2018-2019 The Carpentries .